- My husband and I traveled back to Nebraska at the end of August for my sister-in-law's wedding. It was a wonderful day, the bride was gorgeous, the setting was so pretty and relaxing, and there was cake. What more can you want?
- After the wedding, my dad and I jumped in the car and drove out to western Nebraska so I could spend some time with my family. I got to go kayaking for the first time -- it was so much fun! We spent a gorgeous late summer day on the North Platte River. I didn't realize how badly I needed a little time in nature. I can't think of a better way to recharge.
- While doing so much traveling, I spent some time reevaluating my role as a consumer. Before our trip, I had watched the documentary The True Cost. It's about the social and environmental impacts of the fashion industry, but especially "fast fashion," such as H&M, Forever21, and Target. I wanted to know more, so I picked up the books Overdressed and Wear No Evil to dive a little deeper into responsible fashion.
- Once I had more of an idea of how I was going to adjust my fashion consumer habits, I dove right into the 40 Hanger Closet Challenge. I got rid of about half my clothes, and really focused on keeping things that fit right and made me feel good when I wore them. I went ahead and followed the Challenge's suggestion of buying nice hangers, and I really feel like it made a huge difference. Now when I get dressed, I feel like I am selecting special items from a cute boutique, because my closet is so organized, tidy and put together.
- Next, my husband and I tackled his closet. Now, this is a man who will literally wear something until it falls apart. I can't even tell you how many of his shirts and pants I've had to sneak into the trash. (But after reading Overdressed, I now know to NEVER throw clothes in the trash and to always recycle them!) So to incentivize him a bit, I told him that we could send whatever he wanted to dispose of to Greece to be donated to the Syrian refugees who land there (this was towards the beginning of the massive influx). I am so proud of him -- we sent over 50 pounds of clothes and shoes! I also got him some nicer hangers and did some reorganizing in his closet. All the hangers we no longer needed went to one of my coworkers; her church has a free thrift boutique once a month for people in need, so those were put to good use as well.
- During all of this, a friend recognized my desire to simplify my life and my surroundings, and recommended the book The Life Changing Magic of Tidying Up. It is written by a consultant in Japan who helps clients clean out and organize their homes and offices. I found the book very helpful, but it was definitely written for a different culture. However, the overarching message is one that we all might need to hear from time to time: surround yourself with only things that "spark joy." She also describes the best way to declutter and organize your home, called the KonMari method, so if you need help with that, I'd highly recommend this book.
- In what may have been an act of intervention by the universe, I stumbled upon coupons for a label maker AND plastic storage tubs at Target just as I was getting ready to tackle the rest of our house using the KonMari method. I spent about a week going through the rest of our stuff and getting rid of what no longer sparked joy, and completely reorganizing what was left. I can't even tell you how much cleaner and tidier our house looks now. The old adage, "A place for everything and everything in its place," is truly a game changer.
Monday, October 19, 2015
Whoa!
Oh my gosh, you guys! I cannot believe it's been over TWO MONTHS since my last post. Time really got away from me! Sometimes life kinda gets in the way and sucks up all your free time. Want to know what I've been up to lately? Here's a list :)
Tuesday, August 18, 2015
Grass Fed Flat Iron Steak with Green Chile Adobo
Raise your hand if you like steak! asdtyyugaasdr. That was me trying to type with one hand, 'cause my other hand was still in the air. #hilarious. Raise your hand if you like steak, but are concerned about the environmental impacts, increasing antibiotic resistance, and general health concerns of eating too much conventional red meat due to run-of-the-mill confinement beef production! Ok, I promise I will stop making you raise your hand now. I will just get to my point: Grass-fed beef is better for the environment, better for your body, and better for the cows, but maybe not so great for the taste buds if you don't know what you're doing. Because grass-fed beef has less fat in it, you need to cook it at a lower temperature and for less time than conventional beef or it will dry out and lose flavor. You also need to be okay with eating rare or medium-rare beef, as medium or higher just doesn't turn out that great (trust me, I tried it... miserable failure).
There is one other downside to grass-fed beef: the price tag. It's expensive. But if you focus on cheaper cuts of meat, you can totally make a nice meal for an at-home date night, which will still be way cheaper than going out. So with that in mind, go grab a nice flat iron steak from your local grass-fed ranch, some craft beers or a bottle of red wine, and get ready to sit down to a delicious date night dinner you can feel good about.

First, place a thawed grass-fed flat iron steak on a cutting board and pat both sides dry with paper towels. Season both sides with Kosher salt and freshly ground black pepper. Cut steak in half, and let sit at room temperature for 20 minutes.

In the meantime, add butter and extra-virgin olive oil to a cast iron or stainless steel skillet, and turn to medium-high heat. Let the skillet preheat before adding your steaks. The oil/butter combo should start to shimmer when it is ready. Carefully add your steaks. Cook for three minutes, then flip over and cook for three more minutes.

Using tongs, hold each steak upright side by side and cook all four sides, for about 30 seconds on each side.

Once all four sides are browned, place the steaks on a clean cutting board, sprinkle them with garlic powder, and let them rest for five to ten minutes. This might be the most important part to cooking meat. Yes, I know it smells uh-may-zing and you just want to scarf it down while it's nice and hot, but resting meat is crucial if you don't want to bite into a hockey-puck-like substance. Resting allows the muscle fibers of the meat to relax and reabsorb the juices. If you cut into it before this happens, all the juice escapes its meaty confines and then you are sad. Anyway, once they have properly rested, cut the steaks into strips, slicing against the grain of the meat, to reveal your gorgeous medium-rare interior. Ahhhh.

Transfer the steaks to their serving plates, and drizzle with Green Chile Adobo. We enjoyed ours with a big mixed summer salad and roasted organic red potatoes, along with a bottle of Shiner White Wing for a wonderful weekend dinner. Yum!

Make it work for you
This is one that you will have to make right before you eat. However, it goes very quickly, with a total of about eight minutes of cooking time. The rest is an opportunity to make your sides, set the table, do dishes, etc., which allows for easy prep and clean up, especially if you've already made your Green Chile Adobo. So this recipe is easily doable any night of the week.
Grass-fed Flat Iron Steak with Green Chile Adobo
3/4-1 lb grass-fed flat iron steak
Kosher salt and freshly-ground black pepper
1 tablespoon butter
1 tablespoon extra virgin olive oil
Garlic powder
Green Chile Adobo
Place steak on cutting board and pat both sides dry with a paper towel. Season both sides with Kosher salt and freshly-ground black pepper. Let set at room temperature for 20 minutes.
Put butter and olive oil in cast iron or stainless steel skillet on stove, and turn to medium-high heat. Once oil is shimmering, place the steaks in the pan and cook for three minutes. Flip and cook for three more minutes. Using tongs, hold both steaks thin side down on the pan for 30 seconds. Rotate and cook the next side for 30 seconds. Repeat until all sides are browned.
Place steaks on a clean cutting board. Sprinkle with garlic powder to taste. Tent with aluminum foil and rest for 5-10 minutes. Cut into 3/4-1 inch slices, cutting against the grain. Transfer steaks to serving plates, and drizzle with Green Chile Adobo to taste.
Printer friendly recipe
Wednesday, August 12, 2015
The Oil Cleansing Method
So today I thought I'd talk about something a little different, but still vaguely kitchen-related: The Oil Cleansing Method (OCM). This is a way of cleaning my face that I started to do about two months ago, and I don't know if I'll ever go back to using conventional cleansers on a daily basis. First, a little background...
Growing up, my skin was pretty easy to take care of. I got the occasional pimple as a teenager (two days before a formal dance, like teenage-angst-inducing clockwork), but fortunately I never struggled with acne. So I didn't give much thought to my skin-care regimen. Then, a few years ago (in my mid-twenties), my skin suddenly got SUPER sensitive. Like, the skin around my eyes was constantly red, rashy, and swollen. I had to completely stop using all the cheap drug-store cosmetics, cleansers, and moisturizers that I had relied on for so many years, and start experimenting with more high-quality and expensive items. After a few years (yes, years) and numerous different products, I finally got the redness and swelling under control, but I would still get dry patches under my eyes and on my cheeks. Some days they would be irritated and hurt, and I always ended the day with my skin flaking off, but I kinda just lived with it. Fortunately, I stumbled upon the OCM on Pinterest (isn't Pinterest amazing?!) and decided to give it a shot.

Now, there are tons of good blogs already devoted to the OCM, so I don't feel the need to rehash the process and the benefits here. Mainly, I want to just testify to its effectiveness and tell you how I successfully came up with the best blend for me. When I first started using the OCM, I had no intention of starting a blog, so I didn't take before and after pictures. I am kicking myself for that now. I just wish you all could see the difference in my skin. It's really amazing, especially after all that I've been through trying to get it back to normal. So, if you want to know more about the OCM, go here and here. Go ahead, I'll wait til you get back....
Ok, so now that you know why the OCM is amazing and how to do it, I'm going to let you know how I figured out what works for me. First off, I used the blogs referenced above to decide which carrier oils to use. Since my skin is dry with a normal T-zone, I needed a combination that would moisturize, but not clog my pores with excess oil. So I went with castor, jojoba, and avocado oils. I initially bought the smallest size I could in all three varieties at Sprouts, just in case it didn't work out. This is less economically effective, but I figured I'd be wasting less if I didn't want to continue using the OCM.

I gave myself about two weeks to experiment with different proportions of oils. So to start with, I used the recommended ratio of 10% castor oil and split my two carrier oils (40% avocado and 40% jojoba). During this time, I simply eyeballed each portion and poured them into a shot glass, mixed, and used. I just did enough for one use at a time. Luckily, the 10%:40%:40% ratio worked for me, so I didn't need to do any adjusting. After two weeks, I knew that I loved the OCM and I found the ratio of oils that worked for me. But I wanted to add a little more oomph to my mix. So I used this chart to find an essential oil that would be even more beneficial to my skin. I decided on Geranium oil, and ordered some from Young Living. If you decide to add some essential oil(s) to your blend, this is where the sticker shock may come in. However, Young Living is one of the purest essential oils on the market, and there are ways that the OCM actually saves you money, which I'll discuss later.
Once I received my Geranium oil, I first put a drop on the inside of my elbow before bed, to make sure I didn't have a reaction overnight. Then I did the same on my neck the next night. This let me know that I probably wasn't sensitive to this oil, so I started adding one drop of it to my shot glass mixture. I did this for a week, to make sure I liked the combination and that the skin on my face wouldn't react to it. At that point, I was finally ready to commit to mixing up a batch. I had an empty 3 oz squeeze bottle from a package of travel-sized cosmetic bottles I bought at Target awhile back. So now I just eyeball the 10% caster + 40% jojoba + 40% avocado oils, and leave a little room at the top of the bottle for the Geranium oil. I add 12 drops of that and gently mix everything up.

Alright, let's talk about why I think the OCM is so amazing and that you should try it.
Feel free to use the process I described here and give the Oil Cleansing Method a shot. I hope you love it as much as I do. I would love to hear about your experiences in the comments section!
Growing up, my skin was pretty easy to take care of. I got the occasional pimple as a teenager (two days before a formal dance, like teenage-angst-inducing clockwork), but fortunately I never struggled with acne. So I didn't give much thought to my skin-care regimen. Then, a few years ago (in my mid-twenties), my skin suddenly got SUPER sensitive. Like, the skin around my eyes was constantly red, rashy, and swollen. I had to completely stop using all the cheap drug-store cosmetics, cleansers, and moisturizers that I had relied on for so many years, and start experimenting with more high-quality and expensive items. After a few years (yes, years) and numerous different products, I finally got the redness and swelling under control, but I would still get dry patches under my eyes and on my cheeks. Some days they would be irritated and hurt, and I always ended the day with my skin flaking off, but I kinda just lived with it. Fortunately, I stumbled upon the OCM on Pinterest (isn't Pinterest amazing?!) and decided to give it a shot.

Now, there are tons of good blogs already devoted to the OCM, so I don't feel the need to rehash the process and the benefits here. Mainly, I want to just testify to its effectiveness and tell you how I successfully came up with the best blend for me. When I first started using the OCM, I had no intention of starting a blog, so I didn't take before and after pictures. I am kicking myself for that now. I just wish you all could see the difference in my skin. It's really amazing, especially after all that I've been through trying to get it back to normal. So, if you want to know more about the OCM, go here and here. Go ahead, I'll wait til you get back....
Ok, so now that you know why the OCM is amazing and how to do it, I'm going to let you know how I figured out what works for me. First off, I used the blogs referenced above to decide which carrier oils to use. Since my skin is dry with a normal T-zone, I needed a combination that would moisturize, but not clog my pores with excess oil. So I went with castor, jojoba, and avocado oils. I initially bought the smallest size I could in all three varieties at Sprouts, just in case it didn't work out. This is less economically effective, but I figured I'd be wasting less if I didn't want to continue using the OCM.

I gave myself about two weeks to experiment with different proportions of oils. So to start with, I used the recommended ratio of 10% castor oil and split my two carrier oils (40% avocado and 40% jojoba). During this time, I simply eyeballed each portion and poured them into a shot glass, mixed, and used. I just did enough for one use at a time. Luckily, the 10%:40%:40% ratio worked for me, so I didn't need to do any adjusting. After two weeks, I knew that I loved the OCM and I found the ratio of oils that worked for me. But I wanted to add a little more oomph to my mix. So I used this chart to find an essential oil that would be even more beneficial to my skin. I decided on Geranium oil, and ordered some from Young Living. If you decide to add some essential oil(s) to your blend, this is where the sticker shock may come in. However, Young Living is one of the purest essential oils on the market, and there are ways that the OCM actually saves you money, which I'll discuss later.
Once I received my Geranium oil, I first put a drop on the inside of my elbow before bed, to make sure I didn't have a reaction overnight. Then I did the same on my neck the next night. This let me know that I probably wasn't sensitive to this oil, so I started adding one drop of it to my shot glass mixture. I did this for a week, to make sure I liked the combination and that the skin on my face wouldn't react to it. At that point, I was finally ready to commit to mixing up a batch. I had an empty 3 oz squeeze bottle from a package of travel-sized cosmetic bottles I bought at Target awhile back. So now I just eyeball the 10% caster + 40% jojoba + 40% avocado oils, and leave a little room at the top of the bottle for the Geranium oil. I add 12 drops of that and gently mix everything up.

Alright, let's talk about why I think the OCM is so amazing and that you should try it.
- My skin feels awesome. It also looks awesome. It's moisturized and dewey and looks young and fresh and some days I think I look like I have way more energy than I actually do. Isn't that what we go to the store and/or dermatologist and pay a bunch of money for, ultimately? I still wash my face with a gentle cleanser (Dove unscented bar soup for sensitive skin) two nights a week and I can't believe how raw my face feels afterward. I didn't even realize how much of the natural protection and nourishment I was stripping off with conventional cleansers, even relatively gentle ones, every night.
- On the nights that I use the OCM, I don't even need a moisturizer. I use eye cream and that's it. I also don't need to use a separate eye make-up remover. Those are the two major ways that the OCM saves me money.
- Since my skin is so much more nourished, it's much less reactive to the cosmetics that I use. So when I put moisturizer on in the morning before make-up, I'm actually able to use a less-expensive brand (CeraVe) than I was relying on previously (which still didn't work nearly as well).
- I can customize the types of oils and their ratios to what works best for me and my skin, which is something that you just can't do with cleansers and moisturizers from the store. Therefore, you're not wasting money on products that don't work for you and you don't have to deal with the hassle of trying to return something you don't love.
- The process feels like a mini trip to the spa. Who doesn't love going to the spa?! It's a relaxing way to end your day and let you body know it's almost time for bed.
- The OCM totally lines up with my food philosophy. I know exactly what I'm putting in it and what's going on my skin. This is exactly why I opt to cook at home so much, rather than rely on processed food. So of course it's a natural fit.
Feel free to use the process I described here and give the Oil Cleansing Method a shot. I hope you love it as much as I do. I would love to hear about your experiences in the comments section!
Sunday, August 2, 2015
Asian Cabbage Salad
Sometimes a salad is more than just a salad.
Let me explain. You may notice a few less photos for this post than normal. Basically, I had my day off arranged so that I could prep and photograph this dish during the good afternoon light in my kitchen. I had a few pounds of chicken breasts in the slow cooker for my shredded chicken, set to come out at just the right time for a late lunch/early dinner. Then we get a call that we need to go pick someone up from the hospital and take them home. The chicken is almost done, but not quite, and I'm losing my afternoon light. Life just kinda likes to get in the way of your plans sometimes, huh? Anyway, I felt privileged to have the opportunity to be there for this person when they needed us, so out the door we went. And guess what: when we got back home later, the chicken was somehow not overcooked and I got some okay photos. Life just kinda works out sometimes, huh?
When we finally ate this salad for dinner that night, I first and foremost was glad that our hospital ride was fine and dandy, and I felt just a little more appreciative of the nutrition that bowl full of healthy veggies was providing me. Now, hopefully you don't have to have the opportunity for a similar mini-life lesson when you make this salad, but I hope you appreciate it all the same :)
I modified the recipe from What's for Dinner? to fit our tastes/pantry and make it just a liiiiitle bit healthier. This salad has an amazing crunchy texture and is super satisfying. It can be served as a side (it goes great with salmon and would be perfect to take to a barbeque), or top it off with some Slow Cooker Shredded Chicken to make it an entree.

First, combine all your ingredients for the dressing and put it in the fridge. I really love the taste of sesame oil, so I used a full teaspoon. If you're not as big of a fan, use the smaller amount. I put the dressing in a jelly-sized Mason jar so I could shake it well when I was ready to dress my salad. This can be done up to three days ahead of time. Then, chop your veggies and add them to your bag of coleslaw mix. Stir to combine. Dress the salad 30 to 60 minutes before serving and stick it in the fridge.

Toast your almonds and sesame seeds. Do not try to toast both at once. Since they are different sizes, one will burn before the other is toasted. Set them aside until you're ready to serve the salad.

Add your almonds and sesame seeds to the salad and mix it all together. Place each serving in its dish, and top with chicken if desired. Savor the mix of colors and textures.

Make it work for you
First shift: If using as a side, you can definitely make this salad on a weeknight. If using as an entree, make sure to have some chicken in the fridge, ready to go. Try slow cooking the chicken, chopping the veggies and making the dressing on your "Sunday" to quickly throw it all together for dinner the next night.
Second shift: Make the chicken, chop the veggies, and mix the dressing on your day off. Throw it all together the next day before work for a quick lunch, or take some for dinner. Leave the rest at home for your family's dinner. Eat up any leftovers within two days.
Third shift: Chop the veggies and prep the dressing before you go to sleep. Combine them all and add chicken for dinner, or take some to work for the next few nights. If you need chicken, prep it in the slow cooker insert and stick it in the fridge before you go to bed. Have a spouse/roommate/significant other/kid turn it on to low while you're still sleeping, or turn it on right after you get up. Shred the chicken and add it to your salad.
Asian Cabbage Salad
Modified from What's for Dinner?
Dressing
2 tablespoons extra light olive oil
2 tablespoons apple cider vinegar
1/4 cup rice vinegar
2 tablespoons honey
1/2 teaspoon salt
2 teaspoons soy sauce
1/4 teaspoon garlic powder, or one small garlic clove, pressed or minced
1/4 teaspoon freshly-ground black pepper
1/2 to 1 teaspoon sesame oil
Salad
1-14 ounce bag coleslaw mix
1 stalk celery, sliced
1/2 cucumber, sliced
20 sugar snap peas, ends removed, and sliced
1/2 red bell pepper, thinly sliced
1/4 red onion, thinly sliced
1/3 cup cilantro stems and leaves, chopped (optional)
1 tablespoon sesame seeds
1/2 cup slivered or sliced almonds
Slow Cooker Shredded Chicken, optional
Add all dressing ingredients to jelly-sized Mason jar and shake well. Store in refrigerator until ready to use, up to 3 days ahead of time.
Add salad ingredients to a large bowl and stir. Shake dressing well and mix into salad. Cover and refrigerate for 30-60 minutes.
Heat small, dry nonstick skillet over medium heat. Add almonds and toast until golden brown and fragrant, stirring often. Remove from heat and set aside. Repeat the process for sesame seeds.
Add almonds and sesame to salad when ready to serve. Mix well, divide into serving dishes, and top with chicken if desired.
Printer friendly recipe
Wednesday, July 29, 2015
Pork Chops with Green Chile Adobo
Growing up, we didn't eat much pork. My grandpa raised cattle and my grandma raised chickens -- why stray from what you know? I started cooking pork a few years ago, in order to get a little more variety on our dinner plates. I had no idea what I was doing at first, and definitely churned out some pretty underwhelming dishes. Luckily, instead of giving up on pork, I did a little research and have made some consistently delicious meals ever since.
The secret to good pork is based on the scientific principles of diffusion and osmosis. Their practical application to cooking is called brining. Basically, you make salt water at a specific concentration and soak your pork in it. The salt moves from an area of a higher concentration, the brine, to an area of lower concentration, the meat. Perhaps you remember the saying, "Where salt goes, water follows," from high school science classes. This is where osmosis comes in. The water moves into the cells of the meat, which now has a higher concentration of salt, in order to create balance. This really increases the juiciness of the meat. As an added bonus, the salt infuses the meat with flavor, leaving you a little less work to do down the line. And the best news of all: it only takes 30 minutes to brine pork chops. You have enough time to work on your side dishes while they're brining, without the process taking up your whole night.
When it comes to actually cooking pork chops, I've found the process described at The Kitchn to be quick and reliable. I had a feeling that drizzling on a little Green Chile Adobo before serving would really up the flavor factor, and turns out I was right! (Doesn't it feel good to say that every once in awhile?!) I served ours with a side of mashed butternut squash mixed with a pat of butter, a splash of cream, and some salt, pepper, cumin and smoked paprika for an easy, delicious weeknight meal.

First off, brine your pork chops. You can obviously make them without this step, but they won't taste as good or be nearly as juicy. Brining lean meats takes them from "meh." to "yum!" You can also add other spices and herbs to your brining solution, but I find just the salt to add sufficient flavor. I save my herbs and spices for other uses where they'll be more noticeable. After brining for 30 to 60 minutes, turn your oven on and stick your oven-safe pan in to preheat (non-stick pans are NOT oven safe). Remove your chops from the brining solution and pat dry with paper towels. Rub them with extra-virgin olive oil, and season generously with freshly-ground black pepper. Whenever I brine something, I don't season with salt again until I'm done cooking and have a chance to taste. It rarely needs more. Turn your stove top on to medium-high heat, and CAREFULLY remove your pan from the oven, using oven mitts. Place the pan on the burner, and, using tongs, lay the chops in the pan. You're going to cook them until they are brown on the bottom, for about three to five minutes. Flip the chops, then carefully put the pan back in the oven using oven mitts. Roast until they reach 140 degrees F, for about six to ten minutes. Place them on a plate and cover with aluminum foil for about five to ten minutes in order to allow the juices to settle back in.

Place each chop on its serving plate, drizzle with Green Chile Adobo, and enjoy!

Make it work for you
First shift: These pork chops are easy to pull off on either a work day or day off, especially if you have the Green Chile Adobo prepared in advanced. They also make good leftovers, so you could also treat them as a make-ahead meal and use for lunches throughout the week.
Second shift: I've made these pork chops before work a few times, and it works out great. I got them in the brine, ate breakfast, then finished them off with plenty of time before I had to leave for work. If you make them on your day off for dinner, try to make a few extra for lunches.
Third shift: You can definitely make these on a work night before leaving, or in the morning when you get home. While they're brining, you can eat breakfast, or put together your dinner if you're using them as a make-ahead meal. Then they'd be ready to reheat for lunch/dinner, or to take with you to work.
Pork Chops with Green Chile Adobo
3 tablespoons Kosher salt, or 2 1/2 tablespoons table salt
4-6 pork chops, bone-in or boneless
Extra virgin olive oil
Freshly-ground black pepper
Green Chile Adobo, to taste
In a large microwave-safe bowl, microwave 4 cups of water until warm, about 60-90 seconds. Add salt and stir until dissolved. Add 2 cup cold water and stir, making sure all salt is still dissolved. Place pork chops in salt solution and cover. Refrigerate for 30-60 minutes.
Preheat the oven to 400°F and move the rack to the middle position. Place oven-safe pan in oven to preheat. Remove the pork chops from the brine and pat all sides dry with a paper towel. Rub chops with extra virgin olive oil and season with freshly-ground black pepper. Carefully remove the pan from the oven, using mitts. Place on stove burner turned to medium-high.
Place pork chops in pan and sear until brown on one side, about 3 minutes. Turn chops over and place pan in preheated oven. Roast until chops are done in the thickest part of the meat, until they reach 140°F, about 6-10 minutes. Remove from oven, transfer to plate, and rest for 5-10 minutes.
Transfer to serving dish, spoon juices on top, and drizzle with Green Chile Adobo. Season with additional salt if necessary.
Printer friendly recipe
Wednesday, July 22, 2015
Green Chile Adobo
So about a month ago, I was listening to an America's Test Kitchen podcast while I was in the kitchen cooking. I am a nerd, therefore I must completely nerd out about my obsessions passions, including food and cooking. And baking. And also eating. Anyway, this episode featured renowned Chicago chef, Rick Bayless. He was giving advice on how to replicate his apparently amazing Mexican food at home. One of the suggestions he mentioned was making a batch of his Green Chile Adobo. This can be treated like a sauce or condiment, and he stated that it can be kept in the fridge for up to six months. So the few minutes you invest in making it now really pays off in fresh, herby, spicy dividends for quite awhile. I knew that I had to make some. And I'm so glad I did. This sauce can be used in a variety of ways and will really help make your average weeknight dinner into something a little more special.

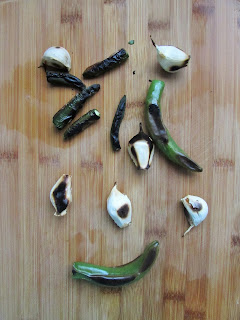
Start off by roughly chopping your cilantro and parsley, and toasting your serranos and garlic. My peppers are all different sizes because we picked some up at the farmers market. Later, when I was at Sprouts, I realized how small they were so I grabbed a few bigger ones while I was there. I guess that's the kind of thing that can happen when you work with a new ingredient for the first time.

Add all your ingredients to your food processor or blender, and let 'er rip.

Blend until the adobo looks similar to pesto. This will fit perfectly in a pint-sized mason jar. If you try a spoonful straight out of the jar, it is going to be sal. ty. But don't panic. When you add it to other food, it's going to contribute a ton of flavor and the saltiness will be diluted. This will work on lots of stuff, like meat, veggies, potatoes, tacos/enchiladas/fajitas, soup, etc. I think you'd be able to add some to mashed avocado for a super easy homemade guacamole, or drizzle a little into the dressing for Southwestern Chopped Salad for an extra boost of flavor. I've used this on top of pork chops and mixed into mashed potatoes, and both were amazing. This is such an easy way to add fresh, unique, homemade flavor to so many dishes, give it a try!

Make it work for you
Another recipe that can fit into anyone's schedule, this sauce can be made at any time. I made mine while cooking a different meal, since I had the cutting board and knife out anyway. It can keep in the fridge for up to six months, so go ahead and throw it together whenever you have a spare 20 minutes.
Green Chile Adobo
by Rick Bayless
1/2 head of garlic, separated into unpeeled cloves
4 to 5 fresh serrano chiles, stems removed
1 large bunch cilantro, (thick bottom stems cut off), roughly chopped (about 2 cups loosely packed)
1 large bunch flat leaf parsley, (thick bottom stems cut off), roughly chopped (about 2 cups loosely packed)
1 cup olive oil
2 generous teaspoons salt
Set a large (10-inch) skillet over medium heat. Lay in the garlic and chiles and roast, turning regularly, until soft and browned in spots, about 10 minutes for the chiles and 15 for the garlic. (If you’re really short on time, you can soften them in a microwave: Cut a slit in each garlic clove and combine with the chiles in a microwavable bowl. Cover with plastic wrap, poke a few holes in the top and microwave on high for 30 seconds.) Cool until handleable, then slip off the garlic’s papery husks. Roughly chop everything (no need to remove the chile seeds).
In a blender or food processor, combine the garlic and chiles with the cilantro, parsley, olive oil and salt. Process, stopping to scrape down the sides if necessary, until nearly smooth (it should look a little like pesto). Transfer to a pint-size jar and store, covered, in the refrigerator, where it will last several months.
Printer friendly recipe

Start off by roughly chopping your cilantro and parsley, and toasting your serranos and garlic. My peppers are all different sizes because we picked some up at the farmers market. Later, when I was at Sprouts, I realized how small they were so I grabbed a few bigger ones while I was there. I guess that's the kind of thing that can happen when you work with a new ingredient for the first time.

You're actually given the option of softening your peppers and garlic in the microwave, but I would discourage it. You just aren't going to be able to replicate the flavor that you get from toasting on the stove. I mean, just look at the char on those things. Makes my mouth water just looking at it! Let the peppers and garlic cool a bit, then remove the skins from the garlic and roughly chop, along with the peppers.

Add all your ingredients to your food processor or blender, and let 'er rip.

Blend until the adobo looks similar to pesto. This will fit perfectly in a pint-sized mason jar. If you try a spoonful straight out of the jar, it is going to be sal. ty. But don't panic. When you add it to other food, it's going to contribute a ton of flavor and the saltiness will be diluted. This will work on lots of stuff, like meat, veggies, potatoes, tacos/enchiladas/fajitas, soup, etc. I think you'd be able to add some to mashed avocado for a super easy homemade guacamole, or drizzle a little into the dressing for Southwestern Chopped Salad for an extra boost of flavor. I've used this on top of pork chops and mixed into mashed potatoes, and both were amazing. This is such an easy way to add fresh, unique, homemade flavor to so many dishes, give it a try!

Make it work for you
Another recipe that can fit into anyone's schedule, this sauce can be made at any time. I made mine while cooking a different meal, since I had the cutting board and knife out anyway. It can keep in the fridge for up to six months, so go ahead and throw it together whenever you have a spare 20 minutes.
Green Chile Adobo
by Rick Bayless
1/2 head of garlic, separated into unpeeled cloves
4 to 5 fresh serrano chiles, stems removed
1 large bunch cilantro, (thick bottom stems cut off), roughly chopped (about 2 cups loosely packed)
1 large bunch flat leaf parsley, (thick bottom stems cut off), roughly chopped (about 2 cups loosely packed)
1 cup olive oil
2 generous teaspoons salt
Set a large (10-inch) skillet over medium heat. Lay in the garlic and chiles and roast, turning regularly, until soft and browned in spots, about 10 minutes for the chiles and 15 for the garlic. (If you’re really short on time, you can soften them in a microwave: Cut a slit in each garlic clove and combine with the chiles in a microwavable bowl. Cover with plastic wrap, poke a few holes in the top and microwave on high for 30 seconds.) Cool until handleable, then slip off the garlic’s papery husks. Roughly chop everything (no need to remove the chile seeds).
In a blender or food processor, combine the garlic and chiles with the cilantro, parsley, olive oil and salt. Process, stopping to scrape down the sides if necessary, until nearly smooth (it should look a little like pesto). Transfer to a pint-size jar and store, covered, in the refrigerator, where it will last several months.
Printer friendly recipe
Friday, July 17, 2015
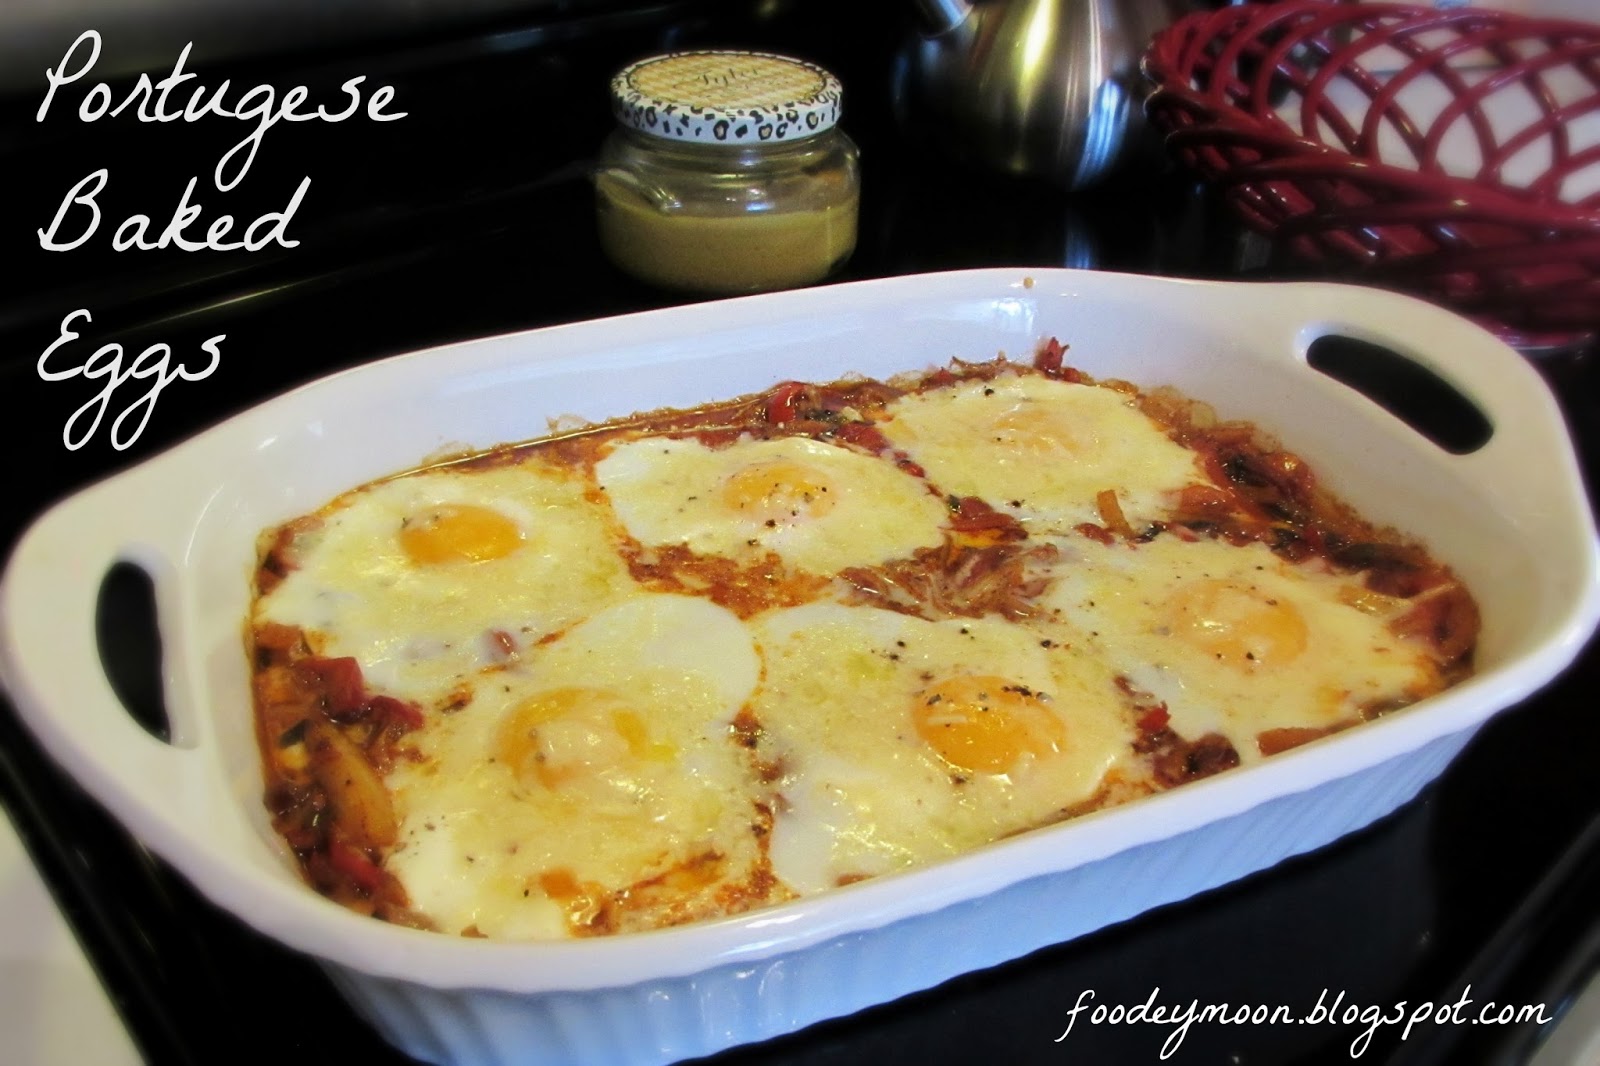
Portuguese Baked Eggs
In my last post, I told you about one of the new perks to my new work schedule: our CSA membership. Well, not to be too repetitive, but this post is about another perk: brunch. I l.o.v.e. breakfast and brunch. What amazing ways to start the day, especially if they involve a gathering of friends and family. There's not much in this world that's more comforting than a nice cup of coffee and some yummy breakfast food shared with your loved ones.
When I was working evenings, my husband's aunt and uncle had us over for brunch a few times. I would drag myself out of bed and stumble through their door, bleary eyed and asking for a cup of coffee, much like a zombie requests brains. Needless to say, we didn't reciprocate their hospitality as we should have. But now I finally have the chance, and I was so excited to do so. Aunt B always pulls out all the stops when she entertains; you can tell it's a passion of hers. Seriously, you should have seen the bridal shower she threw for me. Amazing. I miiight be sucking up a little bit right now. Anyway, I know I'll never get to her Entertaining Level: Expert, so I wanted to focus on serving them something delicious, nutritious, and relatively simple. Enter: Bon Appetit's Portuguese Baked Eggs. I decided to skip the typical syrupy sweet breakfast fare and go for something savory and satisfying. I love an opportunity to get a nice big helping of veggies first thing in the morning. Plus I could do most of the work the night before, which made for a smooth morning.
My attempts have not looked nearly as lovely as Bon Appetit's (duh). Once you plate this dish, you basically end up with ricotta cheese and egg yolk mixing in with the herby bell peppers and tomatoes, which results in an umami explosion in your mouth. This combination of flavors is really something special. I served this dish with farmers market country loaf (sliced and toasted), my great-grandma's homemade jam, fruit salad, and mimosas -- truly entertaining made easy.

One great feature of this dish is that you can actually make the base ahead of time. This first portion can be cooked and stored in the refrigerator for a day or two, then you can continue with the cheese/egg steps when you are ready to serve. Either way, your first step is to slice up your bell peppers and onion while your pan is preheating.

I've found that they don't need a ton of babysitting, so to save time, feel free to put them on the stove to cook while you're completing your next step. Just remember to stir them occasionally.

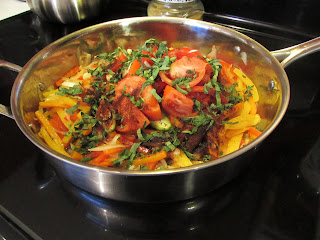
Next, chop and slice your tomatoes, garlic, jalapeno, and herbs, and measure out your spices. Add them all to the pan once the bell peppers and onion are just beginning to brown. Reduce the heat, and let everything simmer and soften and meld together.
Again, this step doesn't need much attention, so you should have time
to do dishes, set the table, etc. while this is happening. Once all the
veggies are very soft and the liquid is mostly gone, remove your
jalapeno slices and season the mix with salt and pepper. [If you are preparing
this base ahead of time, store the veggie mixture in a microwave-safe
container in the fridge for a day or two. Once you are ready to serve,
stick the container in the microwave for a few minutes, until the
mixture is warm, and continue on from here.]
Pour the veggies into a 13x9" casserole dish, forming an even layer. Create six divots in the mixture with the back of a spoon. Add a spoonful of ricotta to each, then top off with an egg. I highly recommend cracking your egg into a small bowl first, just in case it's bad or you get shell in it. The whites will start to cook, due to the heat of the base, but this is ok. Sprinkle cheddar and Parmesan on each egg, and top off with salt and pepper.

Bake for about 15 minutes, turning halfway through, until the egg whites are set. If you prefer runny yolks, take the dish out and serve immediately. The yolks will continue to cook with another minute or two in the oven, or as the dish sits undisturbed outside the oven. Serve with bread or toast to soak up all the savory juices that will be left behind. Yum!

**Note: This recipe can be cut in half and baked in an 8x8" casserole dish, with three or four eggs.
**Another note: Not just for breakfast/brunch, this dish makes a great light dinner as well.
**One more note: I put my slices of bread on a small cookie sheet and toast them in the oven as the dish is baking, flipping and turning about a quarter of the way through, and removing when done to my liking.
Make it work for you
This recipe is super flexible and can work for anyone, since the majority of hands-on work can be done ahead of time. I actually prepared the veggie mixture the night before brunch, while my Scallops with Creamy Braised Leeks were in the slow cooker for dinner. The stove top portion doesn't require constant stirring, so you're free to get started on dishes, cleaning the kitchen, etc., saving you time once it's done. And if you do serve this dish to guests, it looks like you really slaved away all morning, which makes everything taste just a little bit better in my opinion.
Portuguese Baked Eggs
From Bon Appetit
1/4 cup olive oil
3 bell peppers, any color, thinly sliced
1 medium red onion, thinly sliced
2 beefsteak tomatoes, cut into wedges
8 garlic cloves, thinly sliced
1 jalapeno, with seeds, halved lengthwise
1/4 cup fresh basil leaves
2 tablespoons fresh oregano leaves
1 1/2 teaspoons chili powder
1 teaspoon paprika
Kosher salt and freshly ground black pepper
1 cup ricotta
6 large eggs
1 cup grated sharp white cheddar (about 4 oz.)
1/4 cup grated Parmesan (about 1 oz.)
Toasted country-style bread (for serving)
Heat oil in a large heavy pot over medium heat. Add bell peppers and onion and cook, stirring occasionally, until softened and just beginning to brown, 10-12 minutes.
Add tomatoes, garlic, jalapeno, basil, oregano, chili powder, and paprika to pot. Reduce heat to medium-low and continue to cook, stirring occasionally, until vegetables are very soft and liquid is thickened, 20-30 minutes; season with salt and pepper. Discard jalapeno.
Preheat oven to 400°. Transfer bell pepper mixture to a 13x9" baking dish. Using the back of a spoon, make 6 evenly spaced divots in mixture. Spoon a dollop of ricotta into each divot, then crack 1 egg into each. Top with cheddar and Parmesan; season with salt and pepper. Bake, rotating dish halfway through until Parmesan is melted and egg whites are almost set but yolks are still runny, 15-18 minutes.
Serve baked eggs with toast. (Yolks will continue to cook as dish sits, so serve right away if you prefer your eggs soft).
Do Ahead: Bell pepper mixture can be cooked 1 day ahead. Let cool; cover and chill.
Printer friendly version
When I was working evenings, my husband's aunt and uncle had us over for brunch a few times. I would drag myself out of bed and stumble through their door, bleary eyed and asking for a cup of coffee, much like a zombie requests brains. Needless to say, we didn't reciprocate their hospitality as we should have. But now I finally have the chance, and I was so excited to do so. Aunt B always pulls out all the stops when she entertains; you can tell it's a passion of hers. Seriously, you should have seen the bridal shower she threw for me. Amazing. I miiight be sucking up a little bit right now. Anyway, I know I'll never get to her Entertaining Level: Expert, so I wanted to focus on serving them something delicious, nutritious, and relatively simple. Enter: Bon Appetit's Portuguese Baked Eggs. I decided to skip the typical syrupy sweet breakfast fare and go for something savory and satisfying. I love an opportunity to get a nice big helping of veggies first thing in the morning. Plus I could do most of the work the night before, which made for a smooth morning.
My attempts have not looked nearly as lovely as Bon Appetit's (duh). Once you plate this dish, you basically end up with ricotta cheese and egg yolk mixing in with the herby bell peppers and tomatoes, which results in an umami explosion in your mouth. This combination of flavors is really something special. I served this dish with farmers market country loaf (sliced and toasted), my great-grandma's homemade jam, fruit salad, and mimosas -- truly entertaining made easy.
One great feature of this dish is that you can actually make the base ahead of time. This first portion can be cooked and stored in the refrigerator for a day or two, then you can continue with the cheese/egg steps when you are ready to serve. Either way, your first step is to slice up your bell peppers and onion while your pan is preheating.

I've found that they don't need a ton of babysitting, so to save time, feel free to put them on the stove to cook while you're completing your next step. Just remember to stir them occasionally.


Pour the veggies into a 13x9" casserole dish, forming an even layer. Create six divots in the mixture with the back of a spoon. Add a spoonful of ricotta to each, then top off with an egg. I highly recommend cracking your egg into a small bowl first, just in case it's bad or you get shell in it. The whites will start to cook, due to the heat of the base, but this is ok. Sprinkle cheddar and Parmesan on each egg, and top off with salt and pepper.

Bake for about 15 minutes, turning halfway through, until the egg whites are set. If you prefer runny yolks, take the dish out and serve immediately. The yolks will continue to cook with another minute or two in the oven, or as the dish sits undisturbed outside the oven. Serve with bread or toast to soak up all the savory juices that will be left behind. Yum!

**Note: This recipe can be cut in half and baked in an 8x8" casserole dish, with three or four eggs.
**Another note: Not just for breakfast/brunch, this dish makes a great light dinner as well.
**One more note: I put my slices of bread on a small cookie sheet and toast them in the oven as the dish is baking, flipping and turning about a quarter of the way through, and removing when done to my liking.
Make it work for you
This recipe is super flexible and can work for anyone, since the majority of hands-on work can be done ahead of time. I actually prepared the veggie mixture the night before brunch, while my Scallops with Creamy Braised Leeks were in the slow cooker for dinner. The stove top portion doesn't require constant stirring, so you're free to get started on dishes, cleaning the kitchen, etc., saving you time once it's done. And if you do serve this dish to guests, it looks like you really slaved away all morning, which makes everything taste just a little bit better in my opinion.
Portuguese Baked Eggs
From Bon Appetit
1/4 cup olive oil
3 bell peppers, any color, thinly sliced
1 medium red onion, thinly sliced
2 beefsteak tomatoes, cut into wedges
8 garlic cloves, thinly sliced
1 jalapeno, with seeds, halved lengthwise
1/4 cup fresh basil leaves
2 tablespoons fresh oregano leaves
1 1/2 teaspoons chili powder
1 teaspoon paprika
Kosher salt and freshly ground black pepper
1 cup ricotta
6 large eggs
1 cup grated sharp white cheddar (about 4 oz.)
1/4 cup grated Parmesan (about 1 oz.)
Toasted country-style bread (for serving)
Heat oil in a large heavy pot over medium heat. Add bell peppers and onion and cook, stirring occasionally, until softened and just beginning to brown, 10-12 minutes.
Add tomatoes, garlic, jalapeno, basil, oregano, chili powder, and paprika to pot. Reduce heat to medium-low and continue to cook, stirring occasionally, until vegetables are very soft and liquid is thickened, 20-30 minutes; season with salt and pepper. Discard jalapeno.
Preheat oven to 400°. Transfer bell pepper mixture to a 13x9" baking dish. Using the back of a spoon, make 6 evenly spaced divots in mixture. Spoon a dollop of ricotta into each divot, then crack 1 egg into each. Top with cheddar and Parmesan; season with salt and pepper. Bake, rotating dish halfway through until Parmesan is melted and egg whites are almost set but yolks are still runny, 15-18 minutes.
Serve baked eggs with toast. (Yolks will continue to cook as dish sits, so serve right away if you prefer your eggs soft).
Do Ahead: Bell pepper mixture can be cooked 1 day ahead. Let cool; cover and chill.
Printer friendly version
Sunday, July 12, 2015
Scallops with Creamy Braised Leeks
So, something very exciting happened last week. After working second shift for over two years, I finally got the opportunity to switch to first shift! I know it's going to absolutely shock my parents to hear this, but I'm actually much more of a morning person. When I was a teenager, I could sleep til 1:00 pm with the best of 'em. But working as a barista in college really converted me to be an early riser. Those late night second shift hours were really starting to wear on me, so this has been a life change that I'm embracing whole-heartedly.
One of the perks of my new schedule is that it is much more conducive to joining a CSA. We picked up our second box of fresh local produce this week, which included leeks. This is a veggie I had never eaten, let alone cooked. So I reached for my trusty rusty Healthy Slow Cooker Revolution book, and whadya know, they had a couple recipes for leeks. Of course. The one that caught my eye involved scallops, one of my most favorite foods ever, and called for some white wine. So I knew that along with a side salad, it would be perfect for a nice, easy Saturday night dinner with the hubs, and it was. Everything was really simple to throw together, and the two-hour cook time was a perfect opportunity for me to get started on the Portuguese Baked Eggs that I was serving for family brunch the next morning.
This delicate dish has a taste that is reminiscent of a light clam chowder, making it great year round. Ok, here ya go!


Then add your leeks and garlic to a microwave-safe bowl, and nuke it until everything is softened. Dump it into your slow cooker, and stir in your wine (I used sauvignon blanc) and cream. Cook on low for two to three hours, until the leeks are tender.

Once the leeks are tender, but not mushy, season your scallops with salt and pepper, then add to your slow cooker. The recipe calls for sea scallops, but I used bay scallops, which are much smaller. Scallops are a bit pricey, and I didn't want to shell out for sea scallops (haha, get it??), which are more expensive at my grocery store. Since I knew they'd be getting cooked in a sauce anyway, I was less concerned with quality of taste and just got some frozen bay scallops, which ended up saving me about $10 compared to the fresh sea scallops at the meat counter. I knew that I'd have to cut the cooking time of the bay scallops about in half, since they are so much smaller. So if you go a similar route, make sure you start checking your thawed, seasoned scallops after about 15 minutes. Once they are done cooking, stir the cheese into the sauce and add salt and pepper to taste. Garnish with parsley, and enjoy!

One of the perks of my new schedule is that it is much more conducive to joining a CSA. We picked up our second box of fresh local produce this week, which included leeks. This is a veggie I had never eaten, let alone cooked. So I reached for my trusty rusty Healthy Slow Cooker Revolution book, and whadya know, they had a couple recipes for leeks. Of course. The one that caught my eye involved scallops, one of my most favorite foods ever, and called for some white wine. So I knew that along with a side salad, it would be perfect for a nice, easy Saturday night dinner with the hubs, and it was. Everything was really simple to throw together, and the two-hour cook time was a perfect opportunity for me to get started on the Portuguese Baked Eggs that I was serving for family brunch the next morning.
This delicate dish has a taste that is reminiscent of a light clam chowder, making it great year round. Ok, here ya go!

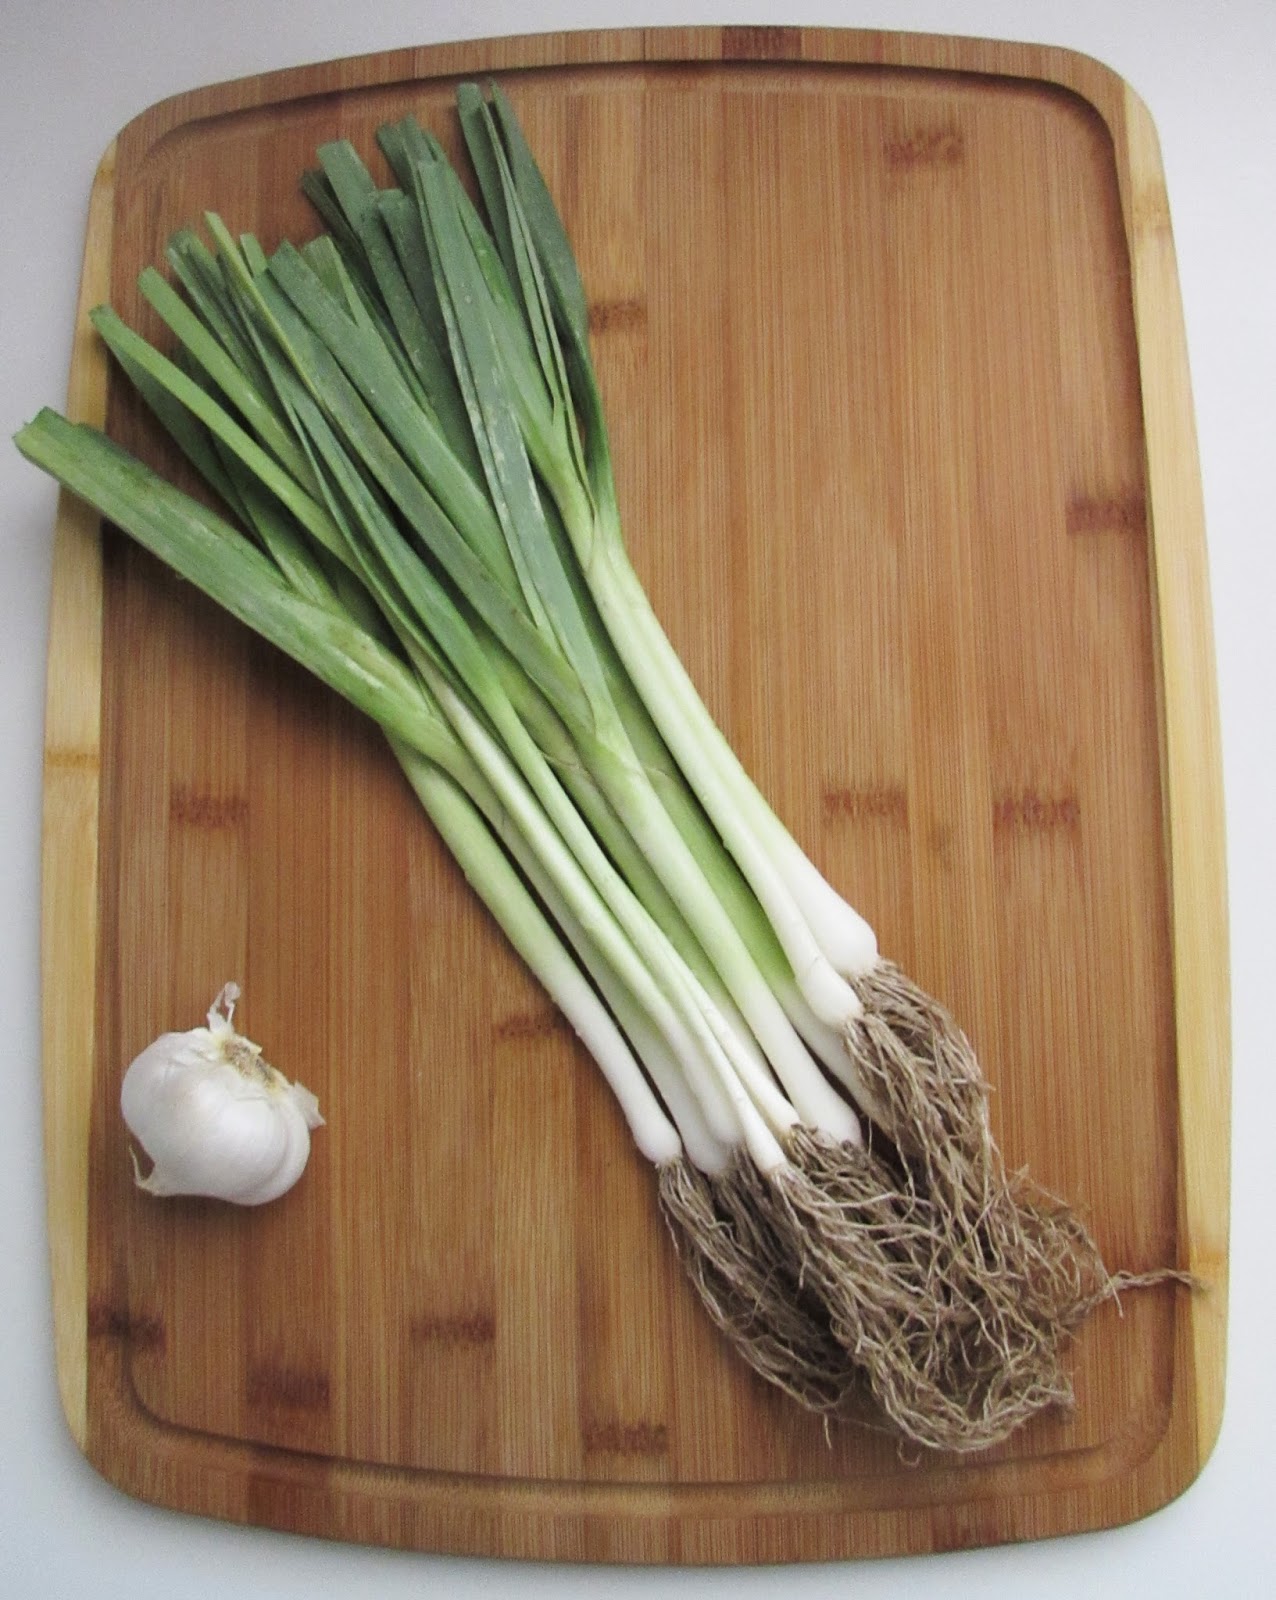
First, slice up your leeks and mince your garlic. The leeks we received were pretty small, like the size of a green onion. We also only got about half a pound, so I had to improvise a bit. I grabbed another full-size leek from the grocery store, which weighed about half a pound, so I then had the full pound of leeks. I left the small leeks intact and thinly sliced them. I sliced the big one into quarters lengthwise, then thin slices, so everything would be about the same size. This ensured even cooking. Once you have the whites and light green parts sliced, you can save the green tops in the freezer to make stock.
Then add your leeks and garlic to a microwave-safe bowl, and nuke it until everything is softened. Dump it into your slow cooker, and stir in your wine (I used sauvignon blanc) and cream. Cook on low for two to three hours, until the leeks are tender.

Once the leeks are tender, but not mushy, season your scallops with salt and pepper, then add to your slow cooker. The recipe calls for sea scallops, but I used bay scallops, which are much smaller. Scallops are a bit pricey, and I didn't want to shell out for sea scallops (haha, get it??), which are more expensive at my grocery store. Since I knew they'd be getting cooked in a sauce anyway, I was less concerned with quality of taste and just got some frozen bay scallops, which ended up saving me about $10 compared to the fresh sea scallops at the meat counter. I knew that I'd have to cut the cooking time of the bay scallops about in half, since they are so much smaller. So if you go a similar route, make sure you start checking your thawed, seasoned scallops after about 15 minutes. Once they are done cooking, stir the cheese into the sauce and add salt and pepper to taste. Garnish with parsley, and enjoy!

Make it work for you
Much like Poached Salmon with Creamy Cucumber Dill Salad, this dish can easily fit into anyone's busy schedule. It is best eaten the day it's made. With little prep and a short slow cooking time, it can be done on a weekday or on a night off. The two-hour cook time gives you ample opportunity to do dishes, clean, prepare a make-ahead meal, or veg out and watch tv or read. The scallops elevate the dish, making it ideal for a relaxing celebratory dinner or date night.
Scallops with Creamy Braised Leeks
1 pound leeks, white and light green parts only, halved lengthwise, sliced thin, and washed thoroughly
4 garlic cloves, minced
1 teaspoon extra-virgin olive oil
1/3 cup heavy cream
1/4 cup dry white wine
1 1/2 pounds large sea scallops, tendons removed
Salt and pepper
1/4 cup grated Pecorino Romano cheese
2 tablespoons minced fresh parsley
1. Microwave leeks, garlic, and oil in bowl, stirring occasionally, until leeks are softened, about 5 minutes; transfer to slow cooker. Stir in cream and wine. Cover and cook until leeks are tender but not mushy, 2 to 3 hours on low.
2. Season scallops with salt and pepper and nestle into slow cooker. Spoon portion of sauce over scallops. Cover and cook until sides of scallops are firm and centers are opaque, 30 to 40 minutes.
3. Transfer scallops to serving platter. Stir Pecorino into sauce and season with salt and pepper to taste. Pour sauce over scallops and sprinkle with parsley. Serve.
Wednesday, July 8, 2015
Toasted Ranch Almonds
Back when I had the metabolism of a hamster that did Iron Man triathlons, I could eat chips every week.. day.... who am I kidding. I ate them with almost every meal. I had three favorites: Cheetos, Funyuns, and Cooler Ranch Doritos. Now I eat each type maaaaybe once or twice a year. I find myself really missing the flavor of the Doritos, especially during these hot summer months, so I wanted to find a way to recreate that cravable crunchy snack, but in a healthy way. So I whipped up some From Scratch Ranch Mix, toasted up some almonds, and dumped the two in a bowl. So easy. The flavor of these Toasted Ranch Almonds is much more subtle than their processed counterparts, but if you've read Salt Sugar Fat, you'll understand why that's actually a good thing. Food companies study human psychology and physiology in order to understand what makes us addicted to things like junk food. They literally manufacture addiction to their product. No thanks.
This snack is homemade, tastes good, is good for you, and is not specifically designed to send your limbic system into overdrive. So take about 15 minutes to throw this snack together and you'll have something to munch on at work for the week. You won't even notice the vending machine and all its processed temptations.
P.S. Once you have the ranch mix made, it will take you about five minutes to make these almonds. So what are you waiting for?!


Then, preheat a 10 inch nonstick skillet on your stove, on medium heat. In a small heatproof bowl, mix one cup of unsalted, raw almonds with one teaspoon extra virgin olive oil. Stir it all up, then pour into skillet.

Cook for about five minutes, stirring often, until nuts are browned and fragrant. Take a quick second to rinse out the small bowl you used to mix the almonds initially, then dry with a paper towel. You're going to use it again, so no need to wash with soap. Once the almonds are toasted, pour them back into the bowl. If they look a little dry, add a little more oil, maybe another 1/2 teaspoon or so. Then add your apple cider vinegar and stir to coat. Add your ranch mix while the nuts are still warm and oily. Give it a good stir and enjoy!
**Note: for more ideas on how to use the ranch mix, click here!
Toasted Ranch Almonds
From Scratch Ranch Mix
5 tablespoons parsley, divided
4 teaspoons dried dill, divided
5 teaspoons garlic powder
3 teaspoons onion powder
3 teaspoons dried onion flakes
2 teaspoons salt
1 teaspoon freshly ground black pepper
1 teaspoon paprika
1/2 teaspoon cayenne pepper
Set aside divided parsley and dill. Combine all other ingredients in a food processor, and grind until fine. Remove from processor and place in storage container; stir in remaining parsley and dill.
Toasted Ranch Almonds
1 cup raw, unsalted almonds
1 teaspoon extra virgin olive oil
1/4 teaspoon apple cider vinegar
1 tablespoon From Scratch Ranch Mix
Preheat a 10 inch nonstick skillet on medium heat. Mix almonds with 1 teaspoon olive oil. Add to skillet, stirring occasionally, until nuts are browned and fragrant, about 5 minutes. While nuts are toasting, quickly rinse out bowl with water and dry with a paper towel. When nuts are done, pour into bowl. Add more olive oil if they are dry, approximately 1/2 teaspoon or as needed. Add apple cider vinegar and stir to combine. Add From Scratch Ranch Mix and stir to coat.
Printer friendly recipe
This snack is homemade, tastes good, is good for you, and is not specifically designed to send your limbic system into overdrive. So take about 15 minutes to throw this snack together and you'll have something to munch on at work for the week. You won't even notice the vending machine and all its processed temptations.
P.S. Once you have the ranch mix made, it will take you about five minutes to make these almonds. So what are you waiting for?!

First, make your From Scratch Ranch Mix.

Then, preheat a 10 inch nonstick skillet on your stove, on medium heat. In a small heatproof bowl, mix one cup of unsalted, raw almonds with one teaspoon extra virgin olive oil. Stir it all up, then pour into skillet.

Cook for about five minutes, stirring often, until nuts are browned and fragrant. Take a quick second to rinse out the small bowl you used to mix the almonds initially, then dry with a paper towel. You're going to use it again, so no need to wash with soap. Once the almonds are toasted, pour them back into the bowl. If they look a little dry, add a little more oil, maybe another 1/2 teaspoon or so. Then add your apple cider vinegar and stir to coat. Add your ranch mix while the nuts are still warm and oily. Give it a good stir and enjoy!
**Note: for more ideas on how to use the ranch mix, click here!
Toasted Ranch Almonds
From Scratch Ranch Mix
5 tablespoons parsley, divided
4 teaspoons dried dill, divided
5 teaspoons garlic powder
3 teaspoons onion powder
3 teaspoons dried onion flakes
2 teaspoons salt
1 teaspoon freshly ground black pepper
1 teaspoon paprika
1/2 teaspoon cayenne pepper
Set aside divided parsley and dill. Combine all other ingredients in a food processor, and grind until fine. Remove from processor and place in storage container; stir in remaining parsley and dill.
Toasted Ranch Almonds
1 cup raw, unsalted almonds
1 teaspoon extra virgin olive oil
1/4 teaspoon apple cider vinegar
1 tablespoon From Scratch Ranch Mix
Preheat a 10 inch nonstick skillet on medium heat. Mix almonds with 1 teaspoon olive oil. Add to skillet, stirring occasionally, until nuts are browned and fragrant, about 5 minutes. While nuts are toasting, quickly rinse out bowl with water and dry with a paper towel. When nuts are done, pour into bowl. Add more olive oil if they are dry, approximately 1/2 teaspoon or as needed. Add apple cider vinegar and stir to combine. Add From Scratch Ranch Mix and stir to coat.
Printer friendly recipe
Tuesday, July 7, 2015
From Scratch Ranch Mix
I'm from the Midwest, where the majority of the population has an addiction to a certain condiment. It's not mayonnaise, although that is debatable. Have you ever seen that scene in How I Met Your Mother where Marshall's mom gives Lily the Eriksen family recipe for Seven-Layer Salad? The so-called salad contains 16 cups of mayo, along with Funyuns and Gummy Bears. It always makes me giggle, because I have definitely had my fair share of Midwestern salads that contain candy (Snickers) and chips (Doritos).
I digress -- no, I was not referring to mayo. Actually, I'm talking about ranch dressing. You know, that wonderful bottle of Hidden Valley amazingness that magically goes with almost everything? I'm not going to be one of those health food snobs who pretends to not like it. It's delicious. And I have missed it immensely. But, no longer! I can now have my ranch flavor and eat it too, and so can you!
It's so cheap and easy to make from scratch, out of stuff you probably have in your pantry already. No more mystery ingredients and the taste of MSG and overly salty, stale spices. You can use this mix to flavor preeeetty much anything. Roasted chicken, meatloaf, stove-top popcorn, Toasted Ranch Almonds, fried chicken, sunflower seeds, Slow Cooker Shredded Chicken, hamburgers, garlic bread, homemade chicken nuggets, turkey burgers, kale chips, boiled, steamed, roasted, and grilled veggies... you are only limited by your imagination. Ok, enough chit chat!

This recipe is an adaptation/combination from Simply Scratch and Gimme Some Oven (is that not the best food blog name you've ever heard??). Mine fits perfectly in a cute little half pint Mason jar.
From Scratch Ranch Mix
5 tablespoons parsley, divided
4 teaspoons dried dill, divided
5 teaspoons garlic powder
3 teaspoons onion powder
3 teaspoons dried onion flakes
2 teaspoons salt
1 teaspoon freshly ground black pepper
1 teaspoon paprika
1/2 teaspoon cayenne pepper
Set aside divided parsley and dill. Combine all other ingredients in a food processor, and grind until fine. Remove from processor and place in storage container; stir in remaining parsley and dill.
To make ranch dressing: Add 3 teaspoons mix to 1/3 cup mayo and 1/3 cup buttermilk. Stir to combine. Add more buttermilk to achieve desired consistency if needed.
Printer friendly recipe
Tuesday, June 30, 2015
Southwestern Chopped Salad
I'm gonna let you in on a little secret. I don't really like salad. There are rare exceptions, however, so you know if I tell you about one, it's good. It'll be worth trying. This is definitely one of them. This is one of the few meals that I have super strong cravings for. When I make it for dinner, I have a second bowl of salad for dessert. I'm not even joking.
This is a close adaptation from The Garden Grazer. I wanted to replace the starches she used with even more colorful, nutritious vegetables. Speaking of, I hope you all know how important it is to "eat the rainbow", in order to help you obtain a wide variety of nutrients. This salad is a delicious way to add a rainbow of colors to your diet. On top of that, the colorful veggies are coated with a thin layer of creamy, tangy dressing that is chock-full of healthy fats, which also help you absorb certain said nutrients more readily. Gosh, no wonder I crave this salad so much.

To start off, prepare your ingredients for the dressing. Did you know that you can use the stems of cilantro along with the leaves? It's true, America's Test Kitchen taste-tested it for The Science of Good Cooking. So go ahead and just roughly chop your bunch of cilantro, no need to perform the time-consuming step of removing the leaves. Score!

Once the remaining dressing ingredients are prepared, puree in a food processor or blender until smooth. The dressing will be thick and the cilantro will be visible as tiny little specks. Stick your dressing in the fridge while you're chopping the salad veggies.

Put your salad veggies in a large bowl, then add the chilled dressing. Mix everything together thoroughly. The cilantro bits in the dressing will give your salad veggies cute little green freckles :)

Divide salad into serving bowls and top with shredded chicken. Devour, then devour some more for dessert. If you have any leftovers, the dressed salad will keep up to two days in the fridge -- perfect for lunches the next day.

**Note: The original linked recipe is vegetarian/vegan friendly, if that's your jam.
Southwestern Chopped Salad
Dressing
1 medium avocado, pit removed and sliced
1 cup roughly chopped cilantro
2 tablespoons lime juice
2 garlic cloves, skin removed
1/4 cup extra virgin olive oil
1 teaspoon white vinegar
1/2 teaspoon cumin
1/8 teaspoon salt
Black pepper to taste
Combine all ingredients in food processor or blender. Process until smooth. Adjust seasonings as needed. Refrigerate until ready to add to salad.
Salad
1 head romaine lettuce, rinsed, chopped and patted/spun/drained dry
2 bell peppers, seeds removed, rinsed, chopped, and dried
1 pint cherry tomatoes, rinsed and chopped
5 green onions, rinsed, sliced, and dried
1/4 red onion, chopped
Slow Cooker Shredded Chicken (optional)
Combine salad vegetables in large bowl. Add all of the dressing and mix until everything is thoroughly combined. Add salad to serving dishes, top with chicken if using. Store leftovers in refrigerator for up to 2 days.
Printer friendly version
Make it work for you
This one can easily work for everyone on a work night/day or a day off. Once you have everything chopped and pureed, it's literally throwing it in a bowl and stirring. The leftovers hold up for two days, making it great to use for lunches. You can also prepare this while your Slow Cooker Shredded Chicken is cooking to serve with it. Or, omit the chicken and use as a side dish.
Subscribe to:
Comments (Atom)