Sometimes a salad is more than just a salad.
Let me explain. You may notice a few less photos for this post than normal. Basically, I had my day off arranged so that I could prep and photograph this dish during the good afternoon light in my kitchen. I had a few pounds of chicken breasts in the slow cooker for my shredded chicken, set to come out at just the right time for a late lunch/early dinner. Then we get a call that we need to go pick someone up from the hospital and take them home. The chicken is almost done, but not quite, and I'm losing my afternoon light. Life just kinda likes to get in the way of your plans sometimes, huh? Anyway, I felt privileged to have the opportunity to be there for this person when they needed us, so out the door we went. And guess what: when we got back home later, the chicken was somehow not overcooked and I got some okay photos. Life just kinda works out sometimes, huh?
When we finally ate this salad for dinner that night, I first and foremost was glad that our hospital ride was fine and dandy, and I felt just a little more appreciative of the nutrition that bowl full of healthy veggies was providing me. Now, hopefully you don't have to have the opportunity for a similar mini-life lesson when you make this salad, but I hope you appreciate it all the same :)
I modified the recipe from What's for Dinner? to fit our tastes/pantry and make it just a liiiiitle bit healthier. This salad has an amazing crunchy texture and is super satisfying. It can be served as a side (it goes great with salmon and would be perfect to take to a barbeque), or top it off with some Slow Cooker Shredded Chicken to make it an entree.
First, combine all your ingredients for the dressing and put it in the fridge. I really love the taste of sesame oil, so I used a full teaspoon. If you're not as big of a fan, use the smaller amount. I put the dressing in a jelly-sized Mason jar so I could shake it well when I was ready to dress my salad. This can be done up to three days ahead of time. Then, chop your veggies and add them to your bag of coleslaw mix. Stir to combine. Dress the salad 30 to 60 minutes before serving and stick it in the fridge.
Toast your almonds and sesame seeds. Do not try to toast both at once. Since they are different sizes, one will burn before the other is toasted. Set them aside until you're ready to serve the salad.
Add your almonds and sesame seeds to the salad and mix it all together. Place each serving in its dish, and top with chicken if desired. Savor the mix of colors and textures.
Make it work for you
First shift: If using as a side, you can definitely make this salad on a weeknight. If using as an entree, make sure to have some chicken in the fridge, ready to go. Try slow cooking the chicken, chopping the veggies and making the dressing on your "Sunday" to quickly throw it all together for dinner the next night.
Second shift: Make the chicken, chop the veggies, and mix the dressing on your day off. Throw it all together the next day before work for a quick lunch, or take some for dinner. Leave the rest at home for your family's dinner. Eat up any leftovers within two days.
Third shift: Chop the veggies and prep the dressing before you go to sleep. Combine them all and add chicken for dinner, or take some to work for the next few nights. If you need chicken, prep it in the slow cooker insert and stick it in the fridge before you go to bed. Have a spouse/roommate/significant other/kid turn it on to low while you're still sleeping, or turn it on right after you get up. Shred the chicken and add it to your salad.
Asian Cabbage Salad
Modified from What's for Dinner?
Dressing
2 tablespoons extra light olive oil
2 tablespoons apple cider vinegar
1/4 cup rice vinegar
2 tablespoons honey
1/2 teaspoon salt
2 teaspoons soy sauce
1/4 teaspoon garlic powder, or one small garlic clove, pressed or minced
1/4 teaspoon freshly-ground black pepper
1/2 to 1 teaspoon sesame oil
Salad
1-14 ounce bag coleslaw mix
1 stalk celery, sliced
1/2 cucumber, sliced
20 sugar snap peas, ends removed, and sliced
1/2 red bell pepper, thinly sliced
1/4 red onion, thinly sliced
1/3 cup cilantro stems and leaves, chopped (optional)
1 tablespoon sesame seeds
1/2 cup slivered or sliced almonds
Slow Cooker Shredded Chicken, optional
Add all dressing ingredients to jelly-sized Mason jar and shake well. Store in refrigerator until ready to use, up to 3 days ahead of time.
Add salad ingredients to a large bowl and stir. Shake dressing well and mix into salad. Cover and refrigerate for 30-60 minutes.
Heat small, dry nonstick skillet over medium heat. Add almonds and toast until golden brown and fragrant, stirring often. Remove from heat and set aside. Repeat the process for sesame seeds.
Add almonds and sesame to salad when ready to serve. Mix well, divide into serving dishes, and top with chicken if desired.
Printer friendly recipe
The inspiration for this blog comes from the five-month-long health hiatus I took immediately following my wedding, my "foodeymoon." I realized that with my weird health-care work hours, I needed to adjust my thinking when it came to preparing nourishing meals for myself and my husband. Most healthy living advice is tailored to people with 9-5 Monday-Friday schedules--I plan on bucking that trend. Whatever your daily schedule, I hope you find some tips you can apply to your life along the way!
Showing posts with label healthy. Show all posts
Sunday, August 2, 2015
Asian Cabbage Salad
Labels:
cooking light,
easy,
eat the rainbow,
first shift,
fresh,
healthy,
healthy cooking,
homemade,
make-ahead meals,
salad,
second shift,
shift work,
third shift,
time management,
vegetables,
vegetarian,
weeknight
Wednesday, July 29, 2015
Pork Chops with Green Chile Adobo
Growing up, we didn't eat much pork. My grandpa raised cattle and my grandma raised chickens -- why stray from what you know? I started cooking pork a few years ago, in order to get a little more variety on our dinner plates. I had no idea what I was doing at first, and definitely churned out some pretty underwhelming dishes. Luckily, instead of giving up on pork, I did a little research and have made some consistently delicious meals ever since.
The secret to good pork is based on the scientific principles of diffusion and osmosis. Their practical application to cooking is called brining. Basically, you make salt water at a specific concentration and soak your pork in it. The salt moves from an area of a higher concentration, the brine, to an area of lower concentration, the meat. Perhaps you remember the saying, "Where salt goes, water follows," from high school science classes. This is where osmosis comes in. The water moves into the cells of the meat, which now has a higher concentration of salt, in order to create balance. This really increases the juiciness of the meat. As an added bonus, the salt infuses the meat with flavor, leaving you a little less work to do down the line. And the best news of all: it only takes 30 minutes to brine pork chops. You have enough time to work on your side dishes while they're brining, without the process taking up your whole night.
When it comes to actually cooking pork chops, I've found the process described at The Kitchn to be quick and reliable. I had a feeling that drizzling on a little Green Chile Adobo before serving would really up the flavor factor, and turns out I was right! (Doesn't it feel good to say that every once in awhile?!) I served ours with a side of mashed butternut squash mixed with a pat of butter, a splash of cream, and some salt, pepper, cumin and smoked paprika for an easy, delicious weeknight meal.
First off, brine your pork chops. You can obviously make them without this step, but they won't taste as good or be nearly as juicy. Brining lean meats takes them from "meh." to "yum!" You can also add other spices and herbs to your brining solution, but I find just the salt to add sufficient flavor. I save my herbs and spices for other uses where they'll be more noticeable. After brining for 30 to 60 minutes, turn your oven on and stick your oven-safe pan in to preheat (non-stick pans are NOT oven safe). Remove your chops from the brining solution and pat dry with paper towels. Rub them with extra-virgin olive oil, and season generously with freshly-ground black pepper. Whenever I brine something, I don't season with salt again until I'm done cooking and have a chance to taste. It rarely needs more. Turn your stove top on to medium-high heat, and CAREFULLY remove your pan from the oven, using oven mitts. Place the pan on the burner, and, using tongs, lay the chops in the pan. You're going to cook them until they are brown on the bottom, for about three to five minutes. Flip the chops, then carefully put the pan back in the oven using oven mitts. Roast until they reach 140 degrees F, for about six to ten minutes. Place them on a plate and cover with aluminum foil for about five to ten minutes in order to allow the juices to settle back in.
Place each chop on its serving plate, drizzle with Green Chile Adobo, and enjoy!
Make it work for you
First shift: These pork chops are easy to pull off on either a work day or day off, especially if you have the Green Chile Adobo prepared in advanced. They also make good leftovers, so you could also treat them as a make-ahead meal and use for lunches throughout the week.
Second shift: I've made these pork chops before work a few times, and it works out great. I got them in the brine, ate breakfast, then finished them off with plenty of time before I had to leave for work. If you make them on your day off for dinner, try to make a few extra for lunches.
Third shift: You can definitely make these on a work night before leaving, or in the morning when you get home. While they're brining, you can eat breakfast, or put together your dinner if you're using them as a make-ahead meal. Then they'd be ready to reheat for lunch/dinner, or to take with you to work.
Pork Chops with Green Chile Adobo
3 tablespoons Kosher salt, or 2 1/2 tablespoons table salt
4-6 pork chops, bone-in or boneless
Extra virgin olive oil
Freshly-ground black pepper
Green Chile Adobo, to taste
In a large microwave-safe bowl, microwave 4 cups of water until warm, about 60-90 seconds. Add salt and stir until dissolved. Add 2 cup cold water and stir, making sure all salt is still dissolved. Place pork chops in salt solution and cover. Refrigerate for 30-60 minutes.
Preheat the oven to 400°F and move the rack to the middle position. Place oven-safe pan in oven to preheat. Remove the pork chops from the brine and pat all sides dry with a paper towel. Rub chops with extra virgin olive oil and season with freshly-ground black pepper. Carefully remove the pan from the oven, using mitts. Place on stove burner turned to medium-high.
Place pork chops in pan and sear until brown on one side, about 3 minutes. Turn chops over and place pan in preheated oven. Roast until chops are done in the thickest part of the meat, until they reach 140°F, about 6-10 minutes. Remove from oven, transfer to plate, and rest for 5-10 minutes.
Transfer to serving dish, spoon juices on top, and drizzle with Green Chile Adobo. Season with additional salt if necessary.
Printer friendly recipe
The secret to good pork is based on the scientific principles of diffusion and osmosis. Their practical application to cooking is called brining. Basically, you make salt water at a specific concentration and soak your pork in it. The salt moves from an area of a higher concentration, the brine, to an area of lower concentration, the meat. Perhaps you remember the saying, "Where salt goes, water follows," from high school science classes. This is where osmosis comes in. The water moves into the cells of the meat, which now has a higher concentration of salt, in order to create balance. This really increases the juiciness of the meat. As an added bonus, the salt infuses the meat with flavor, leaving you a little less work to do down the line. And the best news of all: it only takes 30 minutes to brine pork chops. You have enough time to work on your side dishes while they're brining, without the process taking up your whole night.
When it comes to actually cooking pork chops, I've found the process described at The Kitchn to be quick and reliable. I had a feeling that drizzling on a little Green Chile Adobo before serving would really up the flavor factor, and turns out I was right! (Doesn't it feel good to say that every once in awhile?!) I served ours with a side of mashed butternut squash mixed with a pat of butter, a splash of cream, and some salt, pepper, cumin and smoked paprika for an easy, delicious weeknight meal.
First off, brine your pork chops. You can obviously make them without this step, but they won't taste as good or be nearly as juicy. Brining lean meats takes them from "meh." to "yum!" You can also add other spices and herbs to your brining solution, but I find just the salt to add sufficient flavor. I save my herbs and spices for other uses where they'll be more noticeable. After brining for 30 to 60 minutes, turn your oven on and stick your oven-safe pan in to preheat (non-stick pans are NOT oven safe). Remove your chops from the brining solution and pat dry with paper towels. Rub them with extra-virgin olive oil, and season generously with freshly-ground black pepper. Whenever I brine something, I don't season with salt again until I'm done cooking and have a chance to taste. It rarely needs more. Turn your stove top on to medium-high heat, and CAREFULLY remove your pan from the oven, using oven mitts. Place the pan on the burner, and, using tongs, lay the chops in the pan. You're going to cook them until they are brown on the bottom, for about three to five minutes. Flip the chops, then carefully put the pan back in the oven using oven mitts. Roast until they reach 140 degrees F, for about six to ten minutes. Place them on a plate and cover with aluminum foil for about five to ten minutes in order to allow the juices to settle back in.
Place each chop on its serving plate, drizzle with Green Chile Adobo, and enjoy!
Make it work for you
First shift: These pork chops are easy to pull off on either a work day or day off, especially if you have the Green Chile Adobo prepared in advanced. They also make good leftovers, so you could also treat them as a make-ahead meal and use for lunches throughout the week.
Second shift: I've made these pork chops before work a few times, and it works out great. I got them in the brine, ate breakfast, then finished them off with plenty of time before I had to leave for work. If you make them on your day off for dinner, try to make a few extra for lunches.
Third shift: You can definitely make these on a work night before leaving, or in the morning when you get home. While they're brining, you can eat breakfast, or put together your dinner if you're using them as a make-ahead meal. Then they'd be ready to reheat for lunch/dinner, or to take with you to work.
Pork Chops with Green Chile Adobo
3 tablespoons Kosher salt, or 2 1/2 tablespoons table salt
4-6 pork chops, bone-in or boneless
Extra virgin olive oil
Freshly-ground black pepper
Green Chile Adobo, to taste
In a large microwave-safe bowl, microwave 4 cups of water until warm, about 60-90 seconds. Add salt and stir until dissolved. Add 2 cup cold water and stir, making sure all salt is still dissolved. Place pork chops in salt solution and cover. Refrigerate for 30-60 minutes.
Preheat the oven to 400°F and move the rack to the middle position. Place oven-safe pan in oven to preheat. Remove the pork chops from the brine and pat all sides dry with a paper towel. Rub chops with extra virgin olive oil and season with freshly-ground black pepper. Carefully remove the pan from the oven, using mitts. Place on stove burner turned to medium-high.
Place pork chops in pan and sear until brown on one side, about 3 minutes. Turn chops over and place pan in preheated oven. Roast until chops are done in the thickest part of the meat, until they reach 140°F, about 6-10 minutes. Remove from oven, transfer to plate, and rest for 5-10 minutes.
Transfer to serving dish, spoon juices on top, and drizzle with Green Chile Adobo. Season with additional salt if necessary.
Printer friendly recipe
Labels:
adobo,
brine,
brining,
easy,
first shift,
healthy,
healthy cooking,
make-ahead meals,
Mexican food,
paleo,
pork,
pork chops,
Rick Bayless,
second shift,
shift work,
third shift,
time management,
weeknight
Wednesday, July 22, 2015
Green Chile Adobo
So about a month ago, I was listening to an America's Test Kitchen podcast while I was in the kitchen cooking. I am a nerd, therefore I must completely nerd out about my obsessions passions, including food and cooking. And baking. And also eating. Anyway, this episode featured renowned Chicago chef, Rick Bayless. He was giving advice on how to replicate his apparently amazing Mexican food at home. One of the suggestions he mentioned was making a batch of his Green Chile Adobo. This can be treated like a sauce or condiment, and he stated that it can be kept in the fridge for up to six months. So the few minutes you invest in making it now really pays off in fresh, herby, spicy dividends for quite awhile. I knew that I had to make some. And I'm so glad I did. This sauce can be used in a variety of ways and will really help make your average weeknight dinner into something a little more special.
Start off by roughly chopping your cilantro and parsley, and toasting your serranos and garlic. My peppers are all different sizes because we picked some up at the farmers market. Later, when I was at Sprouts, I realized how small they were so I grabbed a few bigger ones while I was there. I guess that's the kind of thing that can happen when you work with a new ingredient for the first time.
Add all your ingredients to your food processor or blender, and let 'er rip.
Blend until the adobo looks similar to pesto. This will fit perfectly in a pint-sized mason jar. If you try a spoonful straight out of the jar, it is going to be sal. ty. But don't panic. When you add it to other food, it's going to contribute a ton of flavor and the saltiness will be diluted. This will work on lots of stuff, like meat, veggies, potatoes, tacos/enchiladas/fajitas, soup, etc. I think you'd be able to add some to mashed avocado for a super easy homemade guacamole, or drizzle a little into the dressing for Southwestern Chopped Salad for an extra boost of flavor. I've used this on top of pork chops and mixed into mashed potatoes, and both were amazing. This is such an easy way to add fresh, unique, homemade flavor to so many dishes, give it a try!
Make it work for you
Another recipe that can fit into anyone's schedule, this sauce can be made at any time. I made mine while cooking a different meal, since I had the cutting board and knife out anyway. It can keep in the fridge for up to six months, so go ahead and throw it together whenever you have a spare 20 minutes.
Green Chile Adobo
by Rick Bayless
1/2 head of garlic, separated into unpeeled cloves
4 to 5 fresh serrano chiles, stems removed
1 large bunch cilantro, (thick bottom stems cut off), roughly chopped (about 2 cups loosely packed)
1 large bunch flat leaf parsley, (thick bottom stems cut off), roughly chopped (about 2 cups loosely packed)
1 cup olive oil
2 generous teaspoons salt
Set a large (10-inch) skillet over medium heat. Lay in the garlic and chiles and roast, turning regularly, until soft and browned in spots, about 10 minutes for the chiles and 15 for the garlic. (If you’re really short on time, you can soften them in a microwave: Cut a slit in each garlic clove and combine with the chiles in a microwavable bowl. Cover with plastic wrap, poke a few holes in the top and microwave on high for 30 seconds.) Cool until handleable, then slip off the garlic’s papery husks. Roughly chop everything (no need to remove the chile seeds).
In a blender or food processor, combine the garlic and chiles with the cilantro, parsley, olive oil and salt. Process, stopping to scrape down the sides if necessary, until nearly smooth (it should look a little like pesto). Transfer to a pint-size jar and store, covered, in the refrigerator, where it will last several months.
Printer friendly recipe
Start off by roughly chopping your cilantro and parsley, and toasting your serranos and garlic. My peppers are all different sizes because we picked some up at the farmers market. Later, when I was at Sprouts, I realized how small they were so I grabbed a few bigger ones while I was there. I guess that's the kind of thing that can happen when you work with a new ingredient for the first time.
You're actually given the option of softening your peppers and garlic in the microwave, but I would discourage it. You just aren't going to be able to replicate the flavor that you get from toasting on the stove. I mean, just look at the char on those things. Makes my mouth water just looking at it! Let the peppers and garlic cool a bit, then remove the skins from the garlic and roughly chop, along with the peppers.
Add all your ingredients to your food processor or blender, and let 'er rip.
Blend until the adobo looks similar to pesto. This will fit perfectly in a pint-sized mason jar. If you try a spoonful straight out of the jar, it is going to be sal. ty. But don't panic. When you add it to other food, it's going to contribute a ton of flavor and the saltiness will be diluted. This will work on lots of stuff, like meat, veggies, potatoes, tacos/enchiladas/fajitas, soup, etc. I think you'd be able to add some to mashed avocado for a super easy homemade guacamole, or drizzle a little into the dressing for Southwestern Chopped Salad for an extra boost of flavor. I've used this on top of pork chops and mixed into mashed potatoes, and both were amazing. This is such an easy way to add fresh, unique, homemade flavor to so many dishes, give it a try!
Make it work for you
Another recipe that can fit into anyone's schedule, this sauce can be made at any time. I made mine while cooking a different meal, since I had the cutting board and knife out anyway. It can keep in the fridge for up to six months, so go ahead and throw it together whenever you have a spare 20 minutes.
Green Chile Adobo
by Rick Bayless
1/2 head of garlic, separated into unpeeled cloves
4 to 5 fresh serrano chiles, stems removed
1 large bunch cilantro, (thick bottom stems cut off), roughly chopped (about 2 cups loosely packed)
1 large bunch flat leaf parsley, (thick bottom stems cut off), roughly chopped (about 2 cups loosely packed)
1 cup olive oil
2 generous teaspoons salt
Set a large (10-inch) skillet over medium heat. Lay in the garlic and chiles and roast, turning regularly, until soft and browned in spots, about 10 minutes for the chiles and 15 for the garlic. (If you’re really short on time, you can soften them in a microwave: Cut a slit in each garlic clove and combine with the chiles in a microwavable bowl. Cover with plastic wrap, poke a few holes in the top and microwave on high for 30 seconds.) Cool until handleable, then slip off the garlic’s papery husks. Roughly chop everything (no need to remove the chile seeds).
In a blender or food processor, combine the garlic and chiles with the cilantro, parsley, olive oil and salt. Process, stopping to scrape down the sides if necessary, until nearly smooth (it should look a little like pesto). Transfer to a pint-size jar and store, covered, in the refrigerator, where it will last several months.
Printer friendly recipe
Labels:
adobo,
cilantro,
easy,
fresh,
garlic,
healthy,
healthy cooking,
homemade,
Mexican food,
paleo,
Rick Bayless,
sauce,
serrano chile,
vegan,
vegetarian,
weeknight
Friday, July 17, 2015
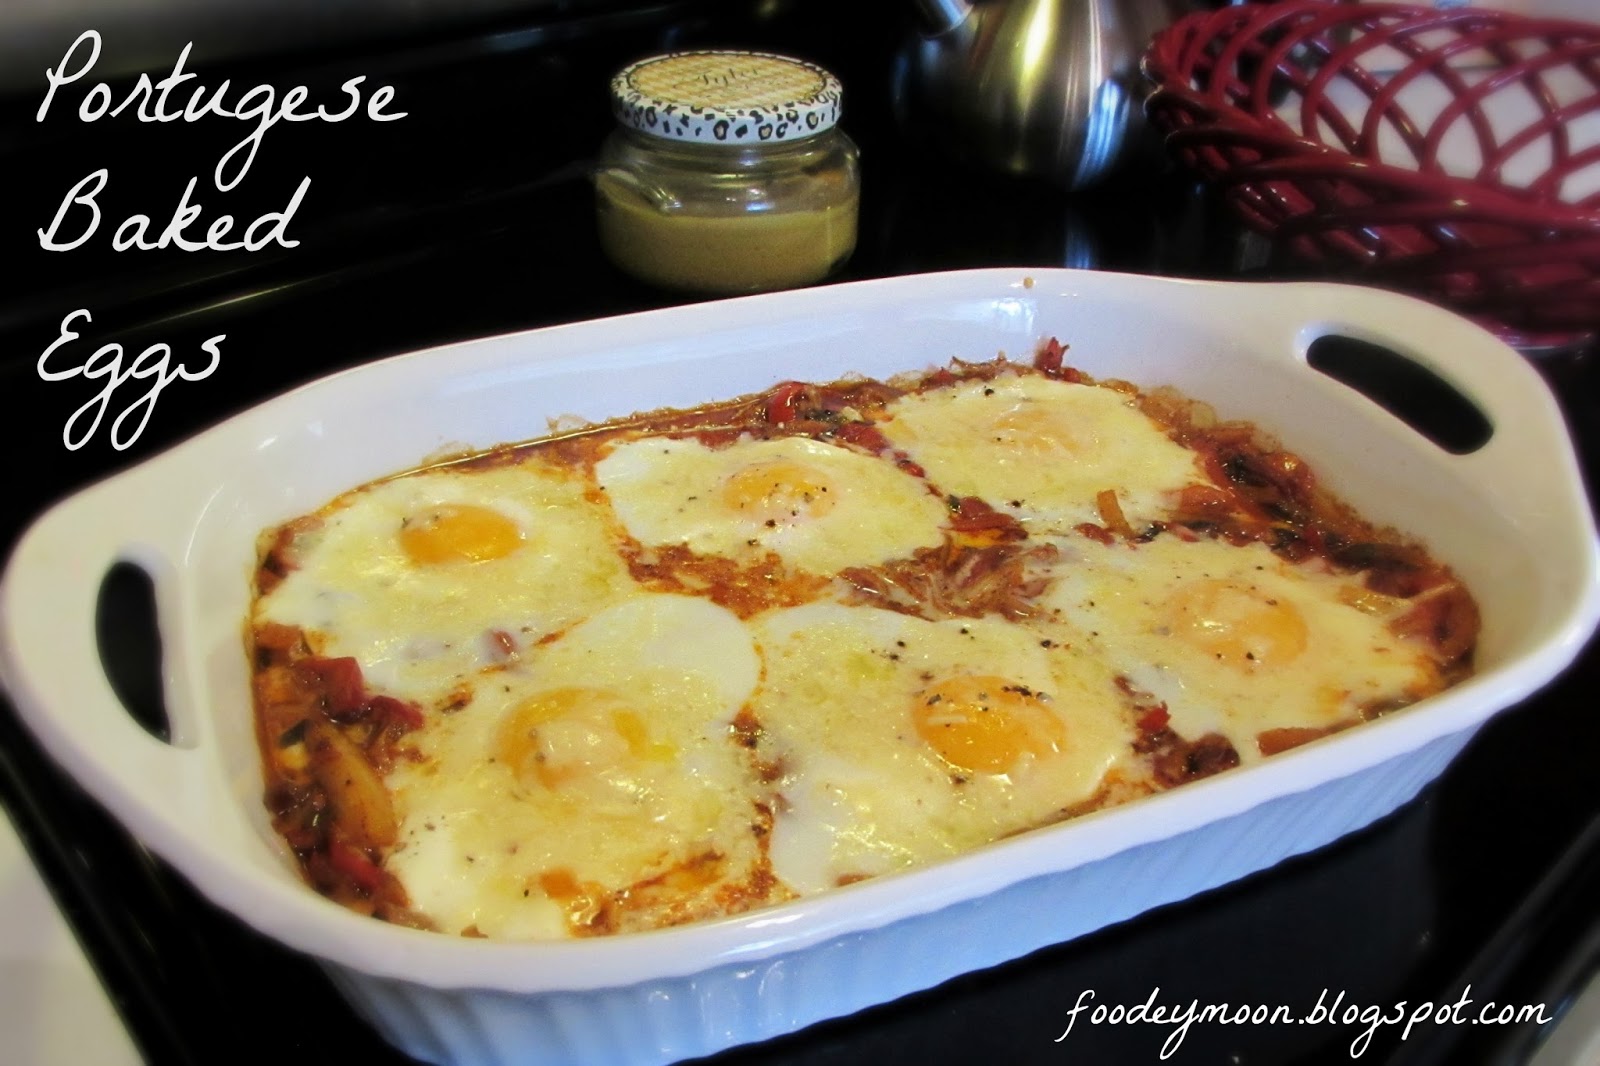
Portuguese Baked Eggs
In my last post, I told you about one of the new perks to my new work schedule: our CSA membership. Well, not to be too repetitive, but this post is about another perk: brunch. I l.o.v.e. breakfast and brunch. What amazing ways to start the day, especially if they involve a gathering of friends and family. There's not much in this world that's more comforting than a nice cup of coffee and some yummy breakfast food shared with your loved ones.
When I was working evenings, my husband's aunt and uncle had us over for brunch a few times. I would drag myself out of bed and stumble through their door, bleary eyed and asking for a cup of coffee, much like a zombie requests brains. Needless to say, we didn't reciprocate their hospitality as we should have. But now I finally have the chance, and I was so excited to do so. Aunt B always pulls out all the stops when she entertains; you can tell it's a passion of hers. Seriously, you should have seen the bridal shower she threw for me. Amazing. I miiight be sucking up a little bit right now. Anyway, I know I'll never get to her Entertaining Level: Expert, so I wanted to focus on serving them something delicious, nutritious, and relatively simple. Enter: Bon Appetit's Portuguese Baked Eggs. I decided to skip the typical syrupy sweet breakfast fare and go for something savory and satisfying. I love an opportunity to get a nice big helping of veggies first thing in the morning. Plus I could do most of the work the night before, which made for a smooth morning.
My attempts have not looked nearly as lovely as Bon Appetit's (duh). Once you plate this dish, you basically end up with ricotta cheese and egg yolk mixing in with the herby bell peppers and tomatoes, which results in an umami explosion in your mouth. This combination of flavors is really something special. I served this dish with farmers market country loaf (sliced and toasted), my great-grandma's homemade jam, fruit salad, and mimosas -- truly entertaining made easy.
One great feature of this dish is that you can actually make the base ahead of time. This first portion can be cooked and stored in the refrigerator for a day or two, then you can continue with the cheese/egg steps when you are ready to serve. Either way, your first step is to slice up your bell peppers and onion while your pan is preheating.
I've found that they don't need a ton of babysitting, so to save time, feel free to put them on the stove to cook while you're completing your next step. Just remember to stir them occasionally.
Next, chop and slice your tomatoes, garlic, jalapeno, and herbs, and measure out your spices. Add them all to the pan once the bell peppers and onion are just beginning to brown. Reduce the heat, and let everything simmer and soften and meld together.
Again, this step doesn't need much attention, so you should have time
to do dishes, set the table, etc. while this is happening. Once all the
veggies are very soft and the liquid is mostly gone, remove your
jalapeno slices and season the mix with salt and pepper. [If you are preparing
this base ahead of time, store the veggie mixture in a microwave-safe
container in the fridge for a day or two. Once you are ready to serve,
stick the container in the microwave for a few minutes, until the
mixture is warm, and continue on from here.]
Pour the veggies into a 13x9" casserole dish, forming an even layer. Create six divots in the mixture with the back of a spoon. Add a spoonful of ricotta to each, then top off with an egg. I highly recommend cracking your egg into a small bowl first, just in case it's bad or you get shell in it. The whites will start to cook, due to the heat of the base, but this is ok. Sprinkle cheddar and Parmesan on each egg, and top off with salt and pepper.
Bake for about 15 minutes, turning halfway through, until the egg whites are set. If you prefer runny yolks, take the dish out and serve immediately. The yolks will continue to cook with another minute or two in the oven, or as the dish sits undisturbed outside the oven. Serve with bread or toast to soak up all the savory juices that will be left behind. Yum!
**Note: This recipe can be cut in half and baked in an 8x8" casserole dish, with three or four eggs.
**Another note: Not just for breakfast/brunch, this dish makes a great light dinner as well.
**One more note: I put my slices of bread on a small cookie sheet and toast them in the oven as the dish is baking, flipping and turning about a quarter of the way through, and removing when done to my liking.
Make it work for you
This recipe is super flexible and can work for anyone, since the majority of hands-on work can be done ahead of time. I actually prepared the veggie mixture the night before brunch, while my Scallops with Creamy Braised Leeks were in the slow cooker for dinner. The stove top portion doesn't require constant stirring, so you're free to get started on dishes, cleaning the kitchen, etc., saving you time once it's done. And if you do serve this dish to guests, it looks like you really slaved away all morning, which makes everything taste just a little bit better in my opinion.
Portuguese Baked Eggs
From Bon Appetit
1/4 cup olive oil
3 bell peppers, any color, thinly sliced
1 medium red onion, thinly sliced
2 beefsteak tomatoes, cut into wedges
8 garlic cloves, thinly sliced
1 jalapeno, with seeds, halved lengthwise
1/4 cup fresh basil leaves
2 tablespoons fresh oregano leaves
1 1/2 teaspoons chili powder
1 teaspoon paprika
Kosher salt and freshly ground black pepper
1 cup ricotta
6 large eggs
1 cup grated sharp white cheddar (about 4 oz.)
1/4 cup grated Parmesan (about 1 oz.)
Toasted country-style bread (for serving)
Heat oil in a large heavy pot over medium heat. Add bell peppers and onion and cook, stirring occasionally, until softened and just beginning to brown, 10-12 minutes.
Add tomatoes, garlic, jalapeno, basil, oregano, chili powder, and paprika to pot. Reduce heat to medium-low and continue to cook, stirring occasionally, until vegetables are very soft and liquid is thickened, 20-30 minutes; season with salt and pepper. Discard jalapeno.
Preheat oven to 400°. Transfer bell pepper mixture to a 13x9" baking dish. Using the back of a spoon, make 6 evenly spaced divots in mixture. Spoon a dollop of ricotta into each divot, then crack 1 egg into each. Top with cheddar and Parmesan; season with salt and pepper. Bake, rotating dish halfway through until Parmesan is melted and egg whites are almost set but yolks are still runny, 15-18 minutes.
Serve baked eggs with toast. (Yolks will continue to cook as dish sits, so serve right away if you prefer your eggs soft).
Do Ahead: Bell pepper mixture can be cooked 1 day ahead. Let cool; cover and chill.
Printer friendly version
When I was working evenings, my husband's aunt and uncle had us over for brunch a few times. I would drag myself out of bed and stumble through their door, bleary eyed and asking for a cup of coffee, much like a zombie requests brains. Needless to say, we didn't reciprocate their hospitality as we should have. But now I finally have the chance, and I was so excited to do so. Aunt B always pulls out all the stops when she entertains; you can tell it's a passion of hers. Seriously, you should have seen the bridal shower she threw for me. Amazing. I miiight be sucking up a little bit right now. Anyway, I know I'll never get to her Entertaining Level: Expert, so I wanted to focus on serving them something delicious, nutritious, and relatively simple. Enter: Bon Appetit's Portuguese Baked Eggs. I decided to skip the typical syrupy sweet breakfast fare and go for something savory and satisfying. I love an opportunity to get a nice big helping of veggies first thing in the morning. Plus I could do most of the work the night before, which made for a smooth morning.
My attempts have not looked nearly as lovely as Bon Appetit's (duh). Once you plate this dish, you basically end up with ricotta cheese and egg yolk mixing in with the herby bell peppers and tomatoes, which results in an umami explosion in your mouth. This combination of flavors is really something special. I served this dish with farmers market country loaf (sliced and toasted), my great-grandma's homemade jam, fruit salad, and mimosas -- truly entertaining made easy.
One great feature of this dish is that you can actually make the base ahead of time. This first portion can be cooked and stored in the refrigerator for a day or two, then you can continue with the cheese/egg steps when you are ready to serve. Either way, your first step is to slice up your bell peppers and onion while your pan is preheating.
I've found that they don't need a ton of babysitting, so to save time, feel free to put them on the stove to cook while you're completing your next step. Just remember to stir them occasionally.
Pour the veggies into a 13x9" casserole dish, forming an even layer. Create six divots in the mixture with the back of a spoon. Add a spoonful of ricotta to each, then top off with an egg. I highly recommend cracking your egg into a small bowl first, just in case it's bad or you get shell in it. The whites will start to cook, due to the heat of the base, but this is ok. Sprinkle cheddar and Parmesan on each egg, and top off with salt and pepper.
Bake for about 15 minutes, turning halfway through, until the egg whites are set. If you prefer runny yolks, take the dish out and serve immediately. The yolks will continue to cook with another minute or two in the oven, or as the dish sits undisturbed outside the oven. Serve with bread or toast to soak up all the savory juices that will be left behind. Yum!
**Note: This recipe can be cut in half and baked in an 8x8" casserole dish, with three or four eggs.
**Another note: Not just for breakfast/brunch, this dish makes a great light dinner as well.
**One more note: I put my slices of bread on a small cookie sheet and toast them in the oven as the dish is baking, flipping and turning about a quarter of the way through, and removing when done to my liking.
Make it work for you
This recipe is super flexible and can work for anyone, since the majority of hands-on work can be done ahead of time. I actually prepared the veggie mixture the night before brunch, while my Scallops with Creamy Braised Leeks were in the slow cooker for dinner. The stove top portion doesn't require constant stirring, so you're free to get started on dishes, cleaning the kitchen, etc., saving you time once it's done. And if you do serve this dish to guests, it looks like you really slaved away all morning, which makes everything taste just a little bit better in my opinion.
Portuguese Baked Eggs
From Bon Appetit
3 bell peppers, any color, thinly sliced
1 medium red onion, thinly sliced
2 beefsteak tomatoes, cut into wedges
8 garlic cloves, thinly sliced
1 jalapeno, with seeds, halved lengthwise
1/4 cup fresh basil leaves
2 tablespoons fresh oregano leaves
1 1/2 teaspoons chili powder
1 teaspoon paprika
Kosher salt and freshly ground black pepper
1 cup ricotta
6 large eggs
1 cup grated sharp white cheddar (about 4 oz.)
1/4 cup grated Parmesan (about 1 oz.)
Toasted country-style bread (for serving)
Heat oil in a large heavy pot over medium heat. Add bell peppers and onion and cook, stirring occasionally, until softened and just beginning to brown, 10-12 minutes.
Add tomatoes, garlic, jalapeno, basil, oregano, chili powder, and paprika to pot. Reduce heat to medium-low and continue to cook, stirring occasionally, until vegetables are very soft and liquid is thickened, 20-30 minutes; season with salt and pepper. Discard jalapeno.
Preheat oven to 400°. Transfer bell pepper mixture to a 13x9" baking dish. Using the back of a spoon, make 6 evenly spaced divots in mixture. Spoon a dollop of ricotta into each divot, then crack 1 egg into each. Top with cheddar and Parmesan; season with salt and pepper. Bake, rotating dish halfway through until Parmesan is melted and egg whites are almost set but yolks are still runny, 15-18 minutes.
Serve baked eggs with toast. (Yolks will continue to cook as dish sits, so serve right away if you prefer your eggs soft).
Do Ahead: Bell pepper mixture can be cooked 1 day ahead. Let cool; cover and chill.
Printer friendly version
Wednesday, July 8, 2015
Toasted Ranch Almonds
Back when I had the metabolism of a hamster that did Iron Man triathlons, I could eat chips every week.. day.... who am I kidding. I ate them with almost every meal. I had three favorites: Cheetos, Funyuns, and Cooler Ranch Doritos. Now I eat each type maaaaybe once or twice a year. I find myself really missing the flavor of the Doritos, especially during these hot summer months, so I wanted to find a way to recreate that cravable crunchy snack, but in a healthy way. So I whipped up some From Scratch Ranch Mix, toasted up some almonds, and dumped the two in a bowl. So easy. The flavor of these Toasted Ranch Almonds is much more subtle than their processed counterparts, but if you've read Salt Sugar Fat, you'll understand why that's actually a good thing. Food companies study human psychology and physiology in order to understand what makes us addicted to things like junk food. They literally manufacture addiction to their product. No thanks.
This snack is homemade, tastes good, is good for you, and is not specifically designed to send your limbic system into overdrive. So take about 15 minutes to throw this snack together and you'll have something to munch on at work for the week. You won't even notice the vending machine and all its processed temptations.
P.S. Once you have the ranch mix made, it will take you about five minutes to make these almonds. So what are you waiting for?!
Then, preheat a 10 inch nonstick skillet on your stove, on medium heat. In a small heatproof bowl, mix one cup of unsalted, raw almonds with one teaspoon extra virgin olive oil. Stir it all up, then pour into skillet.
Cook for about five minutes, stirring often, until nuts are browned and fragrant. Take a quick second to rinse out the small bowl you used to mix the almonds initially, then dry with a paper towel. You're going to use it again, so no need to wash with soap. Once the almonds are toasted, pour them back into the bowl. If they look a little dry, add a little more oil, maybe another 1/2 teaspoon or so. Then add your apple cider vinegar and stir to coat. Add your ranch mix while the nuts are still warm and oily. Give it a good stir and enjoy!
**Note: for more ideas on how to use the ranch mix, click here!
Toasted Ranch Almonds
From Scratch Ranch Mix
5 tablespoons parsley, divided
4 teaspoons dried dill, divided
5 teaspoons garlic powder
3 teaspoons onion powder
3 teaspoons dried onion flakes
2 teaspoons salt
1 teaspoon freshly ground black pepper
1 teaspoon paprika
1/2 teaspoon cayenne pepper
Set aside divided parsley and dill. Combine all other ingredients in a food processor, and grind until fine. Remove from processor and place in storage container; stir in remaining parsley and dill.
Toasted Ranch Almonds
1 cup raw, unsalted almonds
1 teaspoon extra virgin olive oil
1/4 teaspoon apple cider vinegar
1 tablespoon From Scratch Ranch Mix
Preheat a 10 inch nonstick skillet on medium heat. Mix almonds with 1 teaspoon olive oil. Add to skillet, stirring occasionally, until nuts are browned and fragrant, about 5 minutes. While nuts are toasting, quickly rinse out bowl with water and dry with a paper towel. When nuts are done, pour into bowl. Add more olive oil if they are dry, approximately 1/2 teaspoon or as needed. Add apple cider vinegar and stir to combine. Add From Scratch Ranch Mix and stir to coat.
Printer friendly recipe
This snack is homemade, tastes good, is good for you, and is not specifically designed to send your limbic system into overdrive. So take about 15 minutes to throw this snack together and you'll have something to munch on at work for the week. You won't even notice the vending machine and all its processed temptations.
P.S. Once you have the ranch mix made, it will take you about five minutes to make these almonds. So what are you waiting for?!
First, make your From Scratch Ranch Mix.
Then, preheat a 10 inch nonstick skillet on your stove, on medium heat. In a small heatproof bowl, mix one cup of unsalted, raw almonds with one teaspoon extra virgin olive oil. Stir it all up, then pour into skillet.
Cook for about five minutes, stirring often, until nuts are browned and fragrant. Take a quick second to rinse out the small bowl you used to mix the almonds initially, then dry with a paper towel. You're going to use it again, so no need to wash with soap. Once the almonds are toasted, pour them back into the bowl. If they look a little dry, add a little more oil, maybe another 1/2 teaspoon or so. Then add your apple cider vinegar and stir to coat. Add your ranch mix while the nuts are still warm and oily. Give it a good stir and enjoy!
**Note: for more ideas on how to use the ranch mix, click here!
Toasted Ranch Almonds
From Scratch Ranch Mix
5 tablespoons parsley, divided
4 teaspoons dried dill, divided
5 teaspoons garlic powder
3 teaspoons onion powder
3 teaspoons dried onion flakes
2 teaspoons salt
1 teaspoon freshly ground black pepper
1 teaspoon paprika
1/2 teaspoon cayenne pepper
Set aside divided parsley and dill. Combine all other ingredients in a food processor, and grind until fine. Remove from processor and place in storage container; stir in remaining parsley and dill.
Toasted Ranch Almonds
1 cup raw, unsalted almonds
1 teaspoon extra virgin olive oil
1/4 teaspoon apple cider vinegar
1 tablespoon From Scratch Ranch Mix
Preheat a 10 inch nonstick skillet on medium heat. Mix almonds with 1 teaspoon olive oil. Add to skillet, stirring occasionally, until nuts are browned and fragrant, about 5 minutes. While nuts are toasting, quickly rinse out bowl with water and dry with a paper towel. When nuts are done, pour into bowl. Add more olive oil if they are dry, approximately 1/2 teaspoon or as needed. Add apple cider vinegar and stir to combine. Add From Scratch Ranch Mix and stir to coat.
Printer friendly recipe
Labels:
almonds,
healthy,
healthy cooking,
healthy snacks,
homemade,
paleo,
ranch,
snacks,
vegan,
vegetarian
Tuesday, June 30, 2015
Southwestern Chopped Salad
I'm gonna let you in on a little secret. I don't really like salad. There are rare exceptions, however, so you know if I tell you about one, it's good. It'll be worth trying. This is definitely one of them. This is one of the few meals that I have super strong cravings for. When I make it for dinner, I have a second bowl of salad for dessert. I'm not even joking.
This is a close adaptation from The Garden Grazer. I wanted to replace the starches she used with even more colorful, nutritious vegetables. Speaking of, I hope you all know how important it is to "eat the rainbow", in order to help you obtain a wide variety of nutrients. This salad is a delicious way to add a rainbow of colors to your diet. On top of that, the colorful veggies are coated with a thin layer of creamy, tangy dressing that is chock-full of healthy fats, which also help you absorb certain said nutrients more readily. Gosh, no wonder I crave this salad so much.
To start off, prepare your ingredients for the dressing. Did you know that you can use the stems of cilantro along with the leaves? It's true, America's Test Kitchen taste-tested it for The Science of Good Cooking. So go ahead and just roughly chop your bunch of cilantro, no need to perform the time-consuming step of removing the leaves. Score!
Once the remaining dressing ingredients are prepared, puree in a food processor or blender until smooth. The dressing will be thick and the cilantro will be visible as tiny little specks. Stick your dressing in the fridge while you're chopping the salad veggies.
Put your salad veggies in a large bowl, then add the chilled dressing. Mix everything together thoroughly. The cilantro bits in the dressing will give your salad veggies cute little green freckles :)
Divide salad into serving bowls and top with shredded chicken. Devour, then devour some more for dessert. If you have any leftovers, the dressed salad will keep up to two days in the fridge -- perfect for lunches the next day.
**Note: The original linked recipe is vegetarian/vegan friendly, if that's your jam.
Southwestern Chopped Salad
Dressing
1 medium avocado, pit removed and sliced
1 cup roughly chopped cilantro
2 tablespoons lime juice
2 garlic cloves, skin removed
1/4 cup extra virgin olive oil
1 teaspoon white vinegar
1/2 teaspoon cumin
1/8 teaspoon salt
Black pepper to taste
Combine all ingredients in food processor or blender. Process until smooth. Adjust seasonings as needed. Refrigerate until ready to add to salad.
Salad
1 head romaine lettuce, rinsed, chopped and patted/spun/drained dry
2 bell peppers, seeds removed, rinsed, chopped, and dried
1 pint cherry tomatoes, rinsed and chopped
5 green onions, rinsed, sliced, and dried
1/4 red onion, chopped
Slow Cooker Shredded Chicken (optional)
Combine salad vegetables in large bowl. Add all of the dressing and mix until everything is thoroughly combined. Add salad to serving dishes, top with chicken if using. Store leftovers in refrigerator for up to 2 days.
Printer friendly version
Make it work for you
This one can easily work for everyone on a work night/day or a day off. Once you have everything chopped and pureed, it's literally throwing it in a bowl and stirring. The leftovers hold up for two days, making it great to use for lunches. You can also prepare this while your Slow Cooker Shredded Chicken is cooking to serve with it. Or, omit the chicken and use as a side dish.
This is a close adaptation from The Garden Grazer. I wanted to replace the starches she used with even more colorful, nutritious vegetables. Speaking of, I hope you all know how important it is to "eat the rainbow", in order to help you obtain a wide variety of nutrients. This salad is a delicious way to add a rainbow of colors to your diet. On top of that, the colorful veggies are coated with a thin layer of creamy, tangy dressing that is chock-full of healthy fats, which also help you absorb certain said nutrients more readily. Gosh, no wonder I crave this salad so much.
To start off, prepare your ingredients for the dressing. Did you know that you can use the stems of cilantro along with the leaves? It's true, America's Test Kitchen taste-tested it for The Science of Good Cooking. So go ahead and just roughly chop your bunch of cilantro, no need to perform the time-consuming step of removing the leaves. Score!
Once the remaining dressing ingredients are prepared, puree in a food processor or blender until smooth. The dressing will be thick and the cilantro will be visible as tiny little specks. Stick your dressing in the fridge while you're chopping the salad veggies.
Put your salad veggies in a large bowl, then add the chilled dressing. Mix everything together thoroughly. The cilantro bits in the dressing will give your salad veggies cute little green freckles :)
Divide salad into serving bowls and top with shredded chicken. Devour, then devour some more for dessert. If you have any leftovers, the dressed salad will keep up to two days in the fridge -- perfect for lunches the next day.
**Note: The original linked recipe is vegetarian/vegan friendly, if that's your jam.
Southwestern Chopped Salad
Dressing
1 medium avocado, pit removed and sliced
1 cup roughly chopped cilantro
2 tablespoons lime juice
2 garlic cloves, skin removed
1/4 cup extra virgin olive oil
1 teaspoon white vinegar
1/2 teaspoon cumin
1/8 teaspoon salt
Black pepper to taste
Combine all ingredients in food processor or blender. Process until smooth. Adjust seasonings as needed. Refrigerate until ready to add to salad.
Salad
1 head romaine lettuce, rinsed, chopped and patted/spun/drained dry
2 bell peppers, seeds removed, rinsed, chopped, and dried
1 pint cherry tomatoes, rinsed and chopped
5 green onions, rinsed, sliced, and dried
1/4 red onion, chopped
Slow Cooker Shredded Chicken (optional)
Combine salad vegetables in large bowl. Add all of the dressing and mix until everything is thoroughly combined. Add salad to serving dishes, top with chicken if using. Store leftovers in refrigerator for up to 2 days.
Printer friendly version
Make it work for you
This one can easily work for everyone on a work night/day or a day off. Once you have everything chopped and pureed, it's literally throwing it in a bowl and stirring. The leftovers hold up for two days, making it great to use for lunches. You can also prepare this while your Slow Cooker Shredded Chicken is cooking to serve with it. Or, omit the chicken and use as a side dish.
Thursday, June 25, 2015
Slow Cooker Shredded Chicken
So I don't know about you guys, but I think that life is way too short to take a sandwich to work/school every day. I mean, the bread gets soggy and the deli meat, which is inherently kind of gross anyway, what with being trapped in its plastic prison for who knows how long with all that salt and preservatives and who know what else... I forgot what I was saying. Oh yeah. Sandwiches. Every day. Don't do it.
To save your sandwichless sanity, it really helps if you start to think of paper bag lunches that are comprised of meal components, rather than a complete meal. Like, I've got this brown rice, these leftover roasted veggies, and this chicken -- voila, protein bowl. Or, I've got this sweet potato, some frozen broccoli, and this chicken -- voila, loaded sweet potato. Or, I've got this unopened bag of mixed greens that expired a day ago (I can't be the only person this happens to ALL THE TIME, right?!), this hard boiled egg, and this chicken -- voila, salad. Are you sensing a trend here? It's the chicken, right? But I mean, who has that much chicken laying around? I do. And you will too once you see how ridiculously easy it is to keep your fridge stocked with clean, lean protein.
To be clear, I did not devise of this method myself. There have already been a million and one blogs written about this, but none of them really fit my needs: they used too much chicken (my little family of two does not need eight pounds of chicken breasts at the ready) or too much added liquid, or not enough. So here's what works for us.
Place 4 pounds boneless, skinless chicken breasts in slow cooker. Season each side generously with salt and freshly ground black pepper. Add chicken broth. I make broth from scratch and freeze it, some of it in ice cube trays. Each cube is about 2 tablespoons. I used 5 cubes of broth, which ends up being a scant 2/3 cup of broth.
Cook on low for 6-7 hours until chicken is thoroughly cooked but tender. There will likely be lots of liquid in your slow cooker. Don't worry. That flavorful liquid yumminess will soon be absorbed by the shredded chicken.
Now THIS is the fun part. Because it's, well, fun, and it saves you a TON of time. Turn your hand mixer to low and carefully run it through the tender chicken breasts. If you're anything like me, the first time you attempt this, you will stand there with your mixer in one hand, looking back and forth from it to the chicken, thinking that there's no way on earth this is going to work. But it does. I promise. You can also transfer the chicken to a stand mixer and shred it using the paddle attachment. But this is even easier and dirties less dishes.
Action shot! Bam!
And now you have a few pounds of delicious shredded chicken to use however you please. Salads (Asian Cabbage Salad, Southwestern Chopped Salad), sandwiches, pasta, soup, casseroles, tacos, enchiladas, protein bowls... really, anything you can think of. We usually eat what we can for five days, then stash the leftovers in the freezer to use later.
What ways can you think of to use this shredded chicken? I'd love to hear your ideas in the comments!
**Note: I've also made 2 pounds of chicken breasts, with 1/4 broth, cooked on low for 5 hours. So feel free to play around with the amount of chicken and ratio of liquid based off of both methods. It's pretty hard to mess this one up.
Slow Cooker Shredded Chicken
Make it work for you
First shift: This can easily be done on a day off. It does not need babysitting whatsoever so it's a great option to cook while running errands, cleaning, relaxing, etc. Or you can start it right before going to bed, and shred it as soon as you wake up in the morning (it doesn't even take two minutes), and stick it in the fridge.
Second shift: I got this started after I got home from work, then my husband turned it to warm when he woke up 6 hours later. I shredded it and stored it when I woke up an hour after that. So basically we followed the advice for first shift. It worked really well for us. Of course, your day off is a great option too.
Third shift: Again, you could let this cook while sleeping, or on your day off. Another option is to get it started when you get home from work in the morning, then have your significant other, roommate, kids, whoever, finish it off while you're still sleeping.
Printer friendly version
To save your sandwichless sanity, it really helps if you start to think of paper bag lunches that are comprised of meal components, rather than a complete meal. Like, I've got this brown rice, these leftover roasted veggies, and this chicken -- voila, protein bowl. Or, I've got this sweet potato, some frozen broccoli, and this chicken -- voila, loaded sweet potato. Or, I've got this unopened bag of mixed greens that expired a day ago (I can't be the only person this happens to ALL THE TIME, right?!), this hard boiled egg, and this chicken -- voila, salad. Are you sensing a trend here? It's the chicken, right? But I mean, who has that much chicken laying around? I do. And you will too once you see how ridiculously easy it is to keep your fridge stocked with clean, lean protein.
To be clear, I did not devise of this method myself. There have already been a million and one blogs written about this, but none of them really fit my needs: they used too much chicken (my little family of two does not need eight pounds of chicken breasts at the ready) or too much added liquid, or not enough. So here's what works for us.
Place 4 pounds boneless, skinless chicken breasts in slow cooker. Season each side generously with salt and freshly ground black pepper. Add chicken broth. I make broth from scratch and freeze it, some of it in ice cube trays. Each cube is about 2 tablespoons. I used 5 cubes of broth, which ends up being a scant 2/3 cup of broth.
Cook on low for 6-7 hours until chicken is thoroughly cooked but tender. There will likely be lots of liquid in your slow cooker. Don't worry. That flavorful liquid yumminess will soon be absorbed by the shredded chicken.
Now THIS is the fun part. Because it's, well, fun, and it saves you a TON of time. Turn your hand mixer to low and carefully run it through the tender chicken breasts. If you're anything like me, the first time you attempt this, you will stand there with your mixer in one hand, looking back and forth from it to the chicken, thinking that there's no way on earth this is going to work. But it does. I promise. You can also transfer the chicken to a stand mixer and shred it using the paddle attachment. But this is even easier and dirties less dishes.
Action shot! Bam!
And now you have a few pounds of delicious shredded chicken to use however you please. Salads (Asian Cabbage Salad, Southwestern Chopped Salad), sandwiches, pasta, soup, casseroles, tacos, enchiladas, protein bowls... really, anything you can think of. We usually eat what we can for five days, then stash the leftovers in the freezer to use later.
What ways can you think of to use this shredded chicken? I'd love to hear your ideas in the comments!
**Note: I've also made 2 pounds of chicken breasts, with 1/4 broth, cooked on low for 5 hours. So feel free to play around with the amount of chicken and ratio of liquid based off of both methods. It's pretty hard to mess this one up.
Slow Cooker Shredded Chicken
4 pounds boneless, skinless chicken breasts
Salt and pepper
Scant ⅔ cup chicken broth
Place
chicken breasts in slow cooker; season both sides generously with salt
and pepper. Add chicken broth. Cover and cook on low for 6-7 hours.
Carefully shred chicken with hand mixer on low.
Store in fridge for up to 5 days or in freezer for up to 4 months.
Make it work for you
First shift: This can easily be done on a day off. It does not need babysitting whatsoever so it's a great option to cook while running errands, cleaning, relaxing, etc. Or you can start it right before going to bed, and shred it as soon as you wake up in the morning (it doesn't even take two minutes), and stick it in the fridge.
Second shift: I got this started after I got home from work, then my husband turned it to warm when he woke up 6 hours later. I shredded it and stored it when I woke up an hour after that. So basically we followed the advice for first shift. It worked really well for us. Of course, your day off is a great option too.
Third shift: Again, you could let this cook while sleeping, or on your day off. Another option is to get it started when you get home from work in the morning, then have your significant other, roommate, kids, whoever, finish it off while you're still sleeping.
Printer friendly version
Monday, June 22, 2015
Poached Salmon with Creamy Cucumber-Dill Salad
Well, I was in denial for most of our remarkably mild May, but summer is finally upon us in full force here in the Valley of the Sun. After schlepping around running errands all day in the triple-digit heat, I wanted to make something for dinner that was light but filling, and easy to throw together with minimal clean up. And boy, did this one score on all four points. Straight outta Healthy Slow Cooker Revolution (I warned you!), here is Poached Salmon with Creamy Cucumber-Dill Salad.
First, make an aluminum foil sling: Tear off about a foot and a half of aluminum foil, then fold it in half width-wise and line the bottom of your slow cooker insert with it. The sides should come up a few inches (see second photo); this will hold your poaching liquid and help moderate the cooking process. Mince your dill (save the stems!) and slice one lemon.
Place lemon slices in one layer on top of sling, then top with reserved dill stems. Gently pour wine (I used sauvignon blanc) into sling, then add enough water so that the liquid level is even with the top of the lemon slices. You don't want your salmon to be actually submerged in the liquid. Then go ahead and pour yourself a glass of wine, too. You have almost an entire bottle left to drink, better get started!
Next, I sliced a 12 oz salmon fillet length-wise so the two fillets are the same thickness throughout. This helps ensure even cooking. Season with salt and freshly ground black pepper and place the fillets skin side down on top of the lemon arrangement. Cover and cook on low for about one hour. At the 45 minute mark, start checking to see if the salmon is done. It should be opaque throughout and flake with the tip of a paring knife. Mine took 90 minutes to cook to medium (135 degrees F).
In the meantime, slice up your cucumber, then combine with the yogurt, lemon juice, and minced dill, and season with salt and pepper. Stick the cucumber salad in the fridge while the salmon finishes cooking.
When the salmon is opaque, flaky, and 135 degrees F, carefully remove the sling from the slow cooker. Transfer the salmon to a plate using a spatula, removing the dill stems and lemon slices. Serve with the chilled cucumber salad. I also added a nice kale side salad to our dinner, along with a slice of Sprouts bakery bread for a little treat. This plate of food kept us f.u.l.l. for the rest of the night. I know that gargantuan side salad is making the salmon look a little puny, but trust me, it was so big I could hardly finish it.
Make it work for you
Ok, so this is a recipe that can truly work for anyone and everyone. There's only a few minutes of prep to get the salmon cooking, then you can tackle the cucumber salad. I had time to prepare that, on top of chopping up some veggies for our kale salad, and slicing a few pieces of bread, AND I got all the dishes done AND took care of some laundry while the salmon was poaching. By the time we got done eating, all we had to do was stick our dinner dishes in the dishwasher and wash the slow cooker insert, which was crazy easy thanks to the foil sling. We were then free to enjoy the rest of our evening. This dish is perfect for date night (I mean, think of all that wine that's left to drink, wink wink) or weeknight.
**Note: If cucumbers aren't your thing, I don't quite understand you (hehe), but you could definitely make this without the salad. Sprinkle the minced dill on top of the salmon when it's done cooking. Or omit the dill altogether. Or make the yogurt sauce and dip your salmon in it. So many options!
Poached Salmon with Creamy Cucumber-Dill Salad
from America's Test Kitchen Healthy Slow Cooker Revolution
1 lemon, sliced 1/4 inch thick, plus 1 tablespoon juice
2 tablespoons minced fresh dill, stems reserved
1/4 cup dry white wine
2 (6-ounce) skin-on salmon fillets, 1 to 1 1/2 inches thick
Salt and pepper
1/4 cup 2 percent Greek yogurt
1 cucumber, peeled, halved lengthwise, seeded, and sliced thin
1. Fold sheet of aluminum foil into 12 by 9-inch sling, press widthwise into slow cooker. Arrange lemon slices in single layer in bottom of prepared slow cooker. Scatter dill stems over lemon. Pour wine into slow cooker, then add water until liquid level is even with lemon slices (about 1/4 cup water). Season salmon with salt and pepper and place skin side down on top of lemon. Cover and cook until salmon is opaque throughout when checked with tip of paring knife and registers 135 degrees (for medium), about 1 hour on low.
2. Meanwhile, whisk yogurt, lemon juice, and minced dill together in medium bowl. Stir in cucumber and season with salt and pepper to taste.
3. Using sling, transfer salmon to baking sheet. Gently lift and tilt fillets with spatula to remove dill stems and lemon slices and transfer to plates; discard poaching liquid. Serve with salad.
Printer friendly recipe
First, make an aluminum foil sling: Tear off about a foot and a half of aluminum foil, then fold it in half width-wise and line the bottom of your slow cooker insert with it. The sides should come up a few inches (see second photo); this will hold your poaching liquid and help moderate the cooking process. Mince your dill (save the stems!) and slice one lemon.
Place lemon slices in one layer on top of sling, then top with reserved dill stems. Gently pour wine (I used sauvignon blanc) into sling, then add enough water so that the liquid level is even with the top of the lemon slices. You don't want your salmon to be actually submerged in the liquid. Then go ahead and pour yourself a glass of wine, too. You have almost an entire bottle left to drink, better get started!
Next, I sliced a 12 oz salmon fillet length-wise so the two fillets are the same thickness throughout. This helps ensure even cooking. Season with salt and freshly ground black pepper and place the fillets skin side down on top of the lemon arrangement. Cover and cook on low for about one hour. At the 45 minute mark, start checking to see if the salmon is done. It should be opaque throughout and flake with the tip of a paring knife. Mine took 90 minutes to cook to medium (135 degrees F).
In the meantime, slice up your cucumber, then combine with the yogurt, lemon juice, and minced dill, and season with salt and pepper. Stick the cucumber salad in the fridge while the salmon finishes cooking.
When the salmon is opaque, flaky, and 135 degrees F, carefully remove the sling from the slow cooker. Transfer the salmon to a plate using a spatula, removing the dill stems and lemon slices. Serve with the chilled cucumber salad. I also added a nice kale side salad to our dinner, along with a slice of Sprouts bakery bread for a little treat. This plate of food kept us f.u.l.l. for the rest of the night. I know that gargantuan side salad is making the salmon look a little puny, but trust me, it was so big I could hardly finish it.
Make it work for you
Ok, so this is a recipe that can truly work for anyone and everyone. There's only a few minutes of prep to get the salmon cooking, then you can tackle the cucumber salad. I had time to prepare that, on top of chopping up some veggies for our kale salad, and slicing a few pieces of bread, AND I got all the dishes done AND took care of some laundry while the salmon was poaching. By the time we got done eating, all we had to do was stick our dinner dishes in the dishwasher and wash the slow cooker insert, which was crazy easy thanks to the foil sling. We were then free to enjoy the rest of our evening. This dish is perfect for date night (I mean, think of all that wine that's left to drink, wink wink) or weeknight.
**Note: If cucumbers aren't your thing, I don't quite understand you (hehe), but you could definitely make this without the salad. Sprinkle the minced dill on top of the salmon when it's done cooking. Or omit the dill altogether. Or make the yogurt sauce and dip your salmon in it. So many options!
Poached Salmon with Creamy Cucumber-Dill Salad
from America's Test Kitchen Healthy Slow Cooker Revolution
1 lemon, sliced 1/4 inch thick, plus 1 tablespoon juice
2 tablespoons minced fresh dill, stems reserved
1/4 cup dry white wine
2 (6-ounce) skin-on salmon fillets, 1 to 1 1/2 inches thick
Salt and pepper
1/4 cup 2 percent Greek yogurt
1 cucumber, peeled, halved lengthwise, seeded, and sliced thin
1. Fold sheet of aluminum foil into 12 by 9-inch sling, press widthwise into slow cooker. Arrange lemon slices in single layer in bottom of prepared slow cooker. Scatter dill stems over lemon. Pour wine into slow cooker, then add water until liquid level is even with lemon slices (about 1/4 cup water). Season salmon with salt and pepper and place skin side down on top of lemon. Cover and cook until salmon is opaque throughout when checked with tip of paring knife and registers 135 degrees (for medium), about 1 hour on low.
2. Meanwhile, whisk yogurt, lemon juice, and minced dill together in medium bowl. Stir in cucumber and season with salt and pepper to taste.
3. Using sling, transfer salmon to baking sheet. Gently lift and tilt fillets with spatula to remove dill stems and lemon slices and transfer to plates; discard poaching liquid. Serve with salad.
Printer friendly recipe
Labels:
cooking light,
date night,
easy,
healthy,
salmon,
summer,
weeknight,
wine
Sunday, June 7, 2015
Welcome to my new online space!
As an allied health care worker, I've had my fair share of weird schedules. I've worked first, second and third shift, and I am here to tell you, it can be very difficult to live a healthy lifestyle when you're sleeping all day, or getting home at 2:00 am, or leaving for work at 6:00 am. I've noticed that the vast majority of healthy cooking and workout advice is tailored to people with nice, normal 9-5 schedules. There is an utter lack of support for us shift workers, and I hope I can help fill the void. I've tried lots of different ways to keep our kitchen stocked with nourishing homemade food and avoid processed junk. I've had some successes and many failures. In fact, I've had periods where I just thought it was too hard and gave up for awhile. And yes, it is a lot of work, but the payoff is worth it, for sure.
Here is where I will share my failures and successes with you, even if you're lucky enough to have one of those nice, normal 9-5 schedules. Anyone can adapt the tips I've discovered over the last few years to fit their busy lives with a little creative thinking.
I'm not trying to reinvent the wheel. I'm here to help you make the wheel work for you.
Please stay tuned!
Here is where I will share my failures and successes with you, even if you're lucky enough to have one of those nice, normal 9-5 schedules. Anyone can adapt the tips I've discovered over the last few years to fit their busy lives with a little creative thinking.
I'm not trying to reinvent the wheel. I'm here to help you make the wheel work for you.
Please stay tuned!
Subscribe to:
Posts (Atom)