Wednesday, October 26, 2016

Curried Pumpkin Soup

Hello friends! Are you all enjoying fall as much as I am? This is my first real one after living in the desert for four years and it is so glorious. In fact, I want to share one of my favorite fall dishes with you today. It's actually a recipe that I got from my mom; she's been making it for a few years. I modified it a bit to add some bacon, because bacon. Now that I'm in a seasonally appropriate climate, it's going to be my traditional Halloween night dish. I wanted to let you all in on it today, though, in case you wanted to join me and make it on the most spooktacular night of the year!

Curried Pumpkin Soup

12 ounces bacon, thinly sliced
1/2 pound fresh mushrooms, sliced
1/2 cup finely chopped onion
2 tablespoons all-purpose flour
1/2 - 1 teaspoon yellow curry powder
3 cups vegetable broth
1 can (15 ounces) solid-pack pumpkin
1 can (12 ounces) evaporated milk
1 tablespoon honey
1/2 teaspoon salt
1/4 teaspoon pepper
1/4 teaspoon ground nutmeg
Fresh or frozen chives, optional

In a large sauce pan, fry the bacon until it is very crispy, working in batches if needed. Remove the bacon with a slotted spoon and let drain on paper towels. Remove all but two tablespoons of the bacon fat. Saute the onion and mushrooms in the bacon fat until tender. Stir in the flour and curry powder until blended. Gradually add broth. Bring to a boil; cook and stir for two minutes or until thickened.

Add the pumpkin, evaporated milk, honey, salt, pepper, and nutmeg; heat through. Garnish with bacon and chives (if desired) immediately before serving.

Make it work for you

This is totally doable on a work night. The most time-consuming part is slicing up and cooking the bacon, which you could do ahead of time. It's also a great make-ahead recipe. I made this for our Halloween potluck at work last year. I cooked up everything in the first paragraph the night before, then transferred that mixture and the rest of the ingredients to my slow cooker insert. That went inside the fridge until about two hours before lunch. I warmed it up on the low setting and it was all ready for us to enjoy. (Bonus: I got lots of great compliments on it!) This soup also keeps well for leftovers.

Some notes
  • Make sure you get plain pumpkin. Do not get pumpkin pie mix. To verify you're buying the right thing, check the ingredients list: it should say pumpkin, and nothing else.
  • Use the bacon wisely: top off each individual bowl right before eating. The crispy lardons add some great texture.
  • Make this vegetarian by skipping the bacon and sauteing with butter or olive oil instead. Make it vegan by using oil and coconut milk.
  • This would be a great light dinner to make for the night before Thanksgiving. Take care of the bacon a few days ahead of time to really cut down on the hands-on time.
Do not be afraid to try this soup! My husband is a pumpkin skeptic and he loves this stuff. I can't wait to enjoy a bowl of curried fall by the spoonful while handing out candy to adorable trick-or-treaters and watching Charlie Brown. :)

Monday, September 26, 2016

Cultivating Self-Compassion: Letting Go of Perfectionism

Well hello there. I'm so glad you could join me for my third post on The Gifts of Imperfection. I have quite a bit to say about this one so I'm going to just dive right in! This chapter is all about letting go of perfectionist tendencies and learning to be kind to yourself. In my initial post I shared that I scored pretty low on the Self-Compassion Scale, which was a bit of a wake-up call for me. I've always known I have a moderate case of perfectionism and could be hard on myself, but I had no idea to what extent or how my internal dialogue compared to other people. I knew I would need to dig deep and really start to sort some stuff out on the ground level with this chapter.

I need to say: Dr. Brown defines the hell out of perfectionism here. I'll do some brief paraphrasing for the purpose of this entry, but if this is something you even suspect is impacting your daily life, probably just read the book. This chapter alone is worth it. Every paragraph hit so close to home for me and really solidified that perfectionism is emotionally and psychologically harmful in ways I wasn't even remotely thinking about. Here is how Dr. Brown explains perfectionism:

 Perfectionism is not healthy growth and trying to be your best self. It is not about attempting self-improvement. It is a false belief that projecting a perfect life will help us "... minimize or avoid the pain of blame, judgment, and shame" (pg 56). It is a "shield" we use to keep people from thinking bad things about us. Perfectionism feeds into the notion that we are what we accomplish, and how perfectly we can accomplish it. This mindset is debilitating if it keeps you from living a full life because you are too afraid of failure (or even just not being "perfect" at something).

Perfectionism is so prevalent in my life that I have been letting my thoughts ferment for over four weeks since I personally journaled on this chapter. Because of what I do for a living, I think I will always have a struggle with perfectionism. It is not hyperbole to state that a patient of mine could die if I make certain mistakes. (Rest assured, there are levels of fail-safes built into our systems, but it is something that we are trained to remember to hold ourselves to the highest performance standards.) I now know that I need to compartmentalize and learn how to keep the occupational striving for a lack of mistakes separate from my ego and the rest of my life. I need to remember that working to keep my patients safe is completely different and removed from the psychological shield of perfectionism. And when I do make what are ultimately minor mistakes, all things considered, I need to remember to be kind to myself and to learn from them. Much... MUCH easier said than done, but more on that in a minute.

At this point, I think it would be most straight forward to tell you how I've been trying to DIG Deep since starting to mentally and emotionally digest all this information:
  • Get Deliberate: I took the Self-Compassion Scale. My scores were pretty dreary, yet illuminating; to take a glass-half-full approach, I have lots of room to improve. Here is what I managed to flesh out from my results:
    • Self-Kindness - Utilize Dr. Neff's Self-Compassion Break. Be mindful of negative emotions and channel kindness to yourself by speaking to yourself as you would a friend.
    • Self-Judgment and Common Humanity - I think the two aspects mostly go hand-in-hand. Recognizing common humanity -- that we all struggle, often with very similar issues -- should make it easier to be less self-judgmental; they should have an inversely-proportional relationship.
    • Isolation - Another aspect I think would be alleviated by common humanity: we're all in this together, so don't be afraid to claim and share your struggles.
    • Mindfulness - Being present for your life and for your emotions. I know how to do this and why it is so important, I just need to do it more often. I am constantly looking for a distraction lately: food, Facebook, a beer or glass of wine with dinner, Netflix. Again, utilize available guided meditations and self-compassion exercises. Train the brain to hopefully make it habitual eventually.
    • Over-identification - This one is less intuitive for me, I had to look it up. It is basically the antithesis of "true" mindfulness. It is the tendency to lock into thoughts and feelings. For example, if I make a mistake at work, I dwell on it for the rest of the day. It can ruin my mood. I "over-identify" with the shame of not being perfect. A much healthier way to handle this situation would be to take a moment to recognize how I feel, then practice self-compassion by being kind to myself and letting self-judgment go (because we all make mistakes). This is a very deliberate manner in which to grow self-compassion.
               I would like to take the Self-Compassion Scale again in six months or a year to see if/how my scores change, in order to gauge if I am practicing better daily habits.
  • Get Inspired: I need to take cues from the people in my life who don't get shaken up by a mistake or when something doesn't go as planned. Remember that life is too short to dwell on unattainable perfection. Bend, don't break. Brene says, "... our imperfections are not inadequacies, they are reminders that we're all in this together" (pg 61).
  • Get Going: Make self-compassion practices a regular routine. Listen to Dr. Neff's Self-Compassion Break while doing dishes, kneading bread, etc. This one is only five minutes long. I can spare five minutes a day to learn how to be nice to myself.
    • I have also started to take "Get Going" literally. This process has given me a new mantra: Don't let perfect be the enemy of good. This mindset was really hard for me to buy into before. Now, I'm putting it into practice with a new exercise routine. I used to do Crossfit, so I am very much aware of what constitutes effective exercise. Once I stopped going to that gym, however, I just stopped exercising, since I know that you need a combination of cardio+weight training to really be in good shape. I was letting perfect be the enemy of good. I decided that some less-effective exercise is much better than no exercise, so I started Couch to 5k a few weeks ago. I'm not going to beat myself up because I'm "just" running and not killing myself at the gym anymore. I have committed to a goal and I am going to feel good about accomplishing it. Perfect is not going to be the enemy of good anymore.
Now, after all that sharing on my end, I'd love to hear your thoughts and experiences. Do you struggle with perfectionism? Are you like me, where you didn't even realize how much you were struggling with it? Have you found ways to be kind to yourself? Have you done Couch to 5k or want to nerd out over running or other exercise?

I just want to say thank you for reading this post. It was a hard one for me to process and put into words, so I appreciate you hanging in there. And if you have any questions or comments, please feel free to discuss!


Thursday, August 25, 2016

Cultivating Authenticity: Letting Go of What People Think

Welcome to Journal Entry #2! I have to say, working through some of this stuff via writing has helped already. I just feel a little bit emotionally lighter today, and I totally appreciate that. A family member sent me a private message after I posted my last entry, and brought up the importance of working on yourself through every life stage. I couldn't agree more. Thanks for being a part of this little journey.

Moving right along into some groundwork: This chapter in The Gifts of Imperfection focuses on authenticity, defined as "...the daily practice of letting go of who we think we're supposed to be and embracing who we are" (pg 50). Dr. Brown believes authenticity encompasses the "courage to be imperfect," setting boundaries, allowing ourselves to be vulnerable, and exercising compassion with regard to the daily strengths and struggles we all face. She states that people who live in an authentic manner are able to nurture "...the connection and sense of belonging that can only happen when we believe we are enough."

Dr. Brown discovered through her research that speaking out and representing your authentic self is a big shame trigger for women especially. What she found really resonated with me -- it's something I definitely deal with, and I'm sure many of you do, too. I'm just going to quote it verbatim, because I can't say it any better than she did. The struggle to be authentic was described as:
  • "Don't make people feel uncomfortable but be honest.
  • Don't upset anyone or hurt anyone's feelings but say what's on your mind.
  • Sound informed and educated but not like a know-it-all.
  • Don't say anything unpopular or controversial but have the courage to disagree with the crowd" (pg 52).
I mean, being true to yourself ranges from difficult at best to a minefield of impossible contradictions at worst. I for sure struggle with the first two (luckily, in my daily life I am surrounded by awesome nerds so I'd have to try REALLY hard to sound like a know-it-all).

I have to admit, I am having kind of a hard time interpreting this chapter. Perhaps I am reading into things too much, but it seems as though Dr. Brown is encouraging us to speak our minds at almost every given turn in order to be authentic. But that's just not me. As stated above, I really don't like making people feel uncomfortable or hurt their feelings. This Midwesterner happens to think there is a time and place for speaking your mind -- perhaps at work and the Thanksgiving table isn't always it. I'd really be interested in your thoughts on this; it's an area I'd like to flesh out more.

Side note: At the end of the next few chapters, there is a challenge to "DIG Deep," which means:
  • Get Deliberate
  • Get Inspired
  • Get Going
 You are supposed to be able to tailor each aspect to the theme of the chapter. I will share each of mine with you, and I'd love to hear what you come up with for your life in return. Here is how I DIG Deep for authenticity:
  • Get Deliberate: I think about what I want to say. But I also err on the side of not saying anything to avoid conflict and offense. Authenticity is probably an area I need to work on. But I genuinely don't like conflict -- isn't avoiding it being true to my authentic self? However, when I do speak up, it is deliberate and I do own up to it.
  • Get Inspired: Pay attention to how the people you admire handle discussions, debates, etc., but know when to draw the line for you.
  • Get Going: I very much feel in line with what Brene says here at least: "If the goal is authenticity and they don't like me, I'm ok" (pg 54). I truly operate in this manner and have for awhile. So I don't feel the need to speak my mind every 7.5 seconds -- maybe that's ok and authentic for me. It's all a balancing act that I will hopefully figure out over time.
Do you struggle with being authentic, or do you have it figured out? How do you DIG Deep to be true to yourself?

Tuesday, August 23, 2016

Something Different

Hey All,

Long time no talk! I have to tell you: I have no space on my computer for more photos. I have an awesome recipe for a quinoa skillet I can't wait to share, but I need to figure out my storage issue first. Doh! In the meantime, here is a pictureless post.

Real talk: Buying a house has been a major time- and energy-suck. I finally got back into the kitchen regularly a few weeks ago. I made a kind of spur-of-the-moment decision to start baking sourdough, so I've been enjoying working the kinks out of that. Hopefully I'll be at a point to share my experiences with you all soon.

Another thing about buying a house: It's stressful for Type-A perfectionists such as myself. (Hi, I'm Cass, and I'm high-strung.) I'm very much an all-or-nothing doer; I hate hate hate leaving jobs and projects unfinished. Which you have to do when you are working on an entire house. Such external, overwhelming sources of stress (coupled with a few more personal stressors) leave me closed off and, let's say, rigid, mentally and emotionally. Two months of this has left me flirting with the edges of anxiety and depression. Recognizing the need to start to turn things around, I picked up a copy of Brene Brown's The Gifts of Imperfection. I've been hearing of Dr. Brown for a few years but this is the first of her work I've really delved into. Her major focus of research is shame, and her findings stem from mountains of data from interviews with "wholehearted" people. I don't know if this book and the exercises within will be helpful, or if they will be like so much self-help mumbo-jumbo.

But here's the thing: Shame is definitely something that I find paralyzing in my life and it is something I need to tackle head-on. I figure, what better way to do that than to lay it all out there, completely out in the open? I struggle immensely with opening up and discussing my deep feelings -- this is something I recognize in myself. I already have a platform that anyone in the world can access. Maybe utilizing it will help me tear down some of those walls.

A few minutes ago, I took an assessment that Dr. Brown recommends called The Self-Compassion Scale. I did not do well. I scored a 1.99 out of 5.00. What a wake-up call that something's gotta give. So here's my attempt at breaking some things down: I've been journaling along with the questions and prompts in the book for the past few days. Tonight I will post my first entry, then I will continue with subsequent ones regularly.

Here is what I hope:
  • I hope this will give me practice expressing myself and sharing my honest feelings.
  • I hope this will give us a platform for honest discussions regarding feelings of perfectionism, shame, self-compassion, etc.
  • I hope this won't be seen for what it is not: a cry for attention and empty platitudes.

Before I get to my journal entry, I just want to say that I hope to hear from any of you who may be experiencing something similar in your life. I'd love it if you commented, or if you have thoughts regarding this book or Brene Brown. If you got your own copy and followed along with me, I'd love that most of all.

Thanks so much for listening. Maybe there will even be food posts interspersed once I (finally) get my storage issue resolved. Ok, here is my first journal entry:

Shame Resilience and Story Claiming (8/14/16)
  1. Who do you become when you're backed into that shame corner? I become flustered and incredulous that someone dare question me, call me out, disagree with me, etc. I become anxious and physically rigid. My pulse increases, BP rises, breathing becomes very shallow. I don't like myself in that moment. I wish I could just react better and just be a better, smarter, more articulate, well-rounded, whatever, person, perpetuating the shame cycle. In sum: I become anxious and defensive and it manifests physically.
  2. How do you protect yourself? See #1. I become egotistical, defensive, an inflated sense of self. I close myself off so I don't have to fully face criticism, correction, hurt, pain, humiliation, etc.
  3. Who do you call to work through the mean-nasties or the cry-and-hides or the people-pleasing? I pretty much only reach out to E. I'm too embarrassed the admit nasty thoughts to other people, unless it's a rare occasion that I'm talking to A or H. I definitely need to work on keeping up with more consistent relationships to have more of an outlet/connection. I've never been even close to a people-pleaser, so I guess I have that going for me, ha.
  4. What's the most courageous thing you could do for yourself when you feel small and hurt? I could forgive myself if appropriate. I could tell myself it's ok. I could speak up/confront the issue. I could talk it out with someone I care about. I could address the issue with the perpetrator. I could decide if it's worth letting go and do so.

Thursday, June 2, 2016

Spirit Food

The term "soul food" has never really done much for me. I don't relate to the word "soul" -- I find it heavy and unrelatable. I've always been drawn much more to its synonym, spirit, perhaps because of its dual meaning. To me, spirit is the essence of being alive, of being lively, uplifting. Just saying the word itself offers a more joyful experience, to me anyway. All of this is to say: I read a really good book and I wanted to let you know about it.

Reading has always been a favorite pastime of mine. Curling up with a good book or a thought-provoking article truly feeds my spirit. Learning about other cultures, religions, and spiritual practices is such an eye-opening way to expand my horizons, to offer balance to the strict applied science that I employ for 40 hours a week. One of the most fulfilling books I've read is called "Becoming Wise: An Inquiry into the Mystery and Art of Living," by Krista Tippett. If you're a fellow NPR nerd, you'll probably recognize her name. She is the host of "On Being," a show that dives into spiritual, religious, cultural, and scientific inquiries into what it means to be human. (This is my very humble interpretation.) In my opinion, she is one of the best interviewers out there. She has finally written a book to give us all insight into what she has distilled from the twelve years of conversations with scientists, poets, activists, and priests.

I could really go on and on about this book (and her show), but I won't. One chapter really stood out to me and happily is also the most relevant to what I normally discuss here. Flesh: The Body's Grace expounds the scientific and spiritual connection between mind and body. She discusses meditation, yoga, poetry, and... food. And that was what I really needed to hear during this chapter in my life. She discusses an interview she hosted with Dan Barber that struck a chord with me. (If you aren't familiar with his philosophy and work, it's fascinating; consider researching it when you have time.) Dan Barber is credited with bringing "farm to table" to the mainstream, but his work encompasses so much more than that. He talks about food in a spiritual yet practical sense. The science of growing food in an authentically sustainable manner, the process of cooking, the act of nourishing one's body through eating, are all moments to be savored. He explains that there is a correlation between how delicious something tastes (measured in degrees Brix, the concentration of sugar) and how nutritious it is. Now, he's not talking about donuts, obviously, but rather foods like carrots. I find this so fascinating, but also pretty discouraging. When was the last time you tasted a truly delicious carrot? They literally don't make 'em like they used to. If you want something done right, you have to do it yourself, I guess.

Another point that was really driven home to me in this chapter was the connection between what we eat, how we eat it, and how that makes us feel, physically, mentally, and spiritually. I gotta be honest with you, it's been a rough few months for us, food-wise, as I alluded in my last post. Sure, we've been eating some frozen veggies and organic, whole grain chicken nuggets as we deal with our temporary partial kitchen. But frozen veggies aren't nearly as satisfying as a big ol' fresh salad that you just chopped up yourself, or even fresh produce cooked in some manner. And frozen organic chicken nuggets are still frozen chicken nuggets. There's no effort, a lack of wholesomeness, less than stellar nourishment. And I am feeling cut off from my mind-body-spiritual connection as a result. It took Krista Tippet and Dan Barber to point that out to me, it was so all-encompassing.


The good new is: tomorrow is the big day. Soon I'll have to tools and space required to help fix that broken connection. I'll definitely be re-reading this book, especially the Flesh chapter, as I go along. I really encourage you to explore this book and see if there's something in it that you need in your life. There is so much more than what I discussed here. There is an abundance of beauty, love, and hope within its pages, which I believe we could all really use right now in this cultural climate.

---

Have you read this book? What did you think about it? Is there a similar one you recommend? Have you overcame that lack of mind-body-spirit connection? If so, how? Or how are you planning on starting? Please let me know your thoughts in the comments, I'd love to hear of your experiences!

Wednesday, June 1, 2016

Hello from CO!

Well now. In my last post I was embarrassed that I hadn't posted in almost two months... over six months later, here I am again! I have an excuse, I swear! My husband and I relocated to BEAUTIFUL Northern Colorado and I couldn't be happier about it! I was offered a job at an area hospital lab in the Transfusion Services department, and something was telling me that I just had to go for it. And I am SO glad we did!

In the meantime, we've been living in a furnished one-bedroom apartment with, like, half a kitchen. Hence the complete lack of posts here. I would like to say that I've been doing the best I can with what I was provided, and that's probably mostly true. But we've been eating way more processed food than we were used to and it's starting to show, heh, and we can definitely feel it. But luckily! We close on our new house in less than two days! We can't wait to start this new chapter in our lives, and I most certainly can't wait to bust all my wonderful kitchen supplies out of their storage locker prison and get back to some healthful, wholesome, homemade meals.

Which brings me to my next point. As we adapt to single-family-home-ownership over the next few months, I think I will be taking this li'l blog o' mine in a little bit of a new direction for awhile. Basically, I'll probably be too distracted by household projects to delve into new recipes much. So I think I will start to incorporate more "lifestyle" into what I write about: cleaning, decorating, gardening, etc., so you can follow along with what we discover along the way. Plus everybody loves learning about cleaning tips and decorating ideas, right? Or is that just me?

Like I said, we are so excited for this new leg in our journey (including Tilly the cat -- she can't wait for more territory to rule over), and I truly hope you'll stay tuned and join me on it. And if you have any advice regarding moving into a new-to-you home, please leave it in the comments -- I'm sure we need all the help we can get! Thanks, and have a beautiful day!

Monday, October 19, 2015

Whoa!

Oh my gosh, you guys! I cannot believe it's been over TWO MONTHS since my last post. Time really got away from me! Sometimes life kinda gets in the way and sucks up all your free time. Want to know what I've been up to lately? Here's a list :)

  • My husband and I traveled back to Nebraska at the end of August for my sister-in-law's wedding. It was a wonderful day, the bride was gorgeous, the setting was so pretty and relaxing, and there was cake. What more can you want?
  • After the wedding, my dad and I jumped in the car and drove out to western Nebraska so I could spend some time with my family. I got to go kayaking for the first time -- it was so much fun! We spent a gorgeous late summer day on the North Platte River. I didn't realize how badly I needed a little time in nature. I can't think of a better way to recharge.
  • While doing so much traveling, I spent some time reevaluating my role as a consumer. Before our trip, I had watched the documentary The True Cost. It's about the social and environmental impacts of the fashion industry, but especially "fast fashion," such as H&M, Forever21, and Target. I wanted to know more, so I picked up the books Overdressed and Wear No Evil to dive a little deeper into responsible fashion.
  • Once I had more of an idea of how I was going to adjust my fashion consumer habits, I dove right into the 40 Hanger Closet Challenge. I got rid of about half my clothes, and really focused on keeping things that fit right and made me feel good when I wore them. I went ahead and followed the Challenge's suggestion of buying nice hangers, and I really feel like it made a huge difference. Now when I get dressed, I feel like I am selecting special items from a cute boutique, because my closet is so organized, tidy and put together.
  • Next, my husband and I tackled his closet. Now, this is a man who will literally wear something until it falls apart. I can't even tell you how many of his shirts and pants I've had to sneak into the trash. (But after reading Overdressed, I now know to NEVER throw clothes in the trash and to always recycle them!) So to incentivize him a bit, I told him that we could send whatever he wanted to dispose of to Greece to be donated to the Syrian refugees who land there (this was towards the beginning of the massive influx). I am so proud of him -- we sent over 50 pounds of clothes and shoes! I also got him some nicer hangers and did some reorganizing in his closet. All the hangers we no longer needed went to one of my coworkers; her church has a free thrift boutique once a month for people in need, so those were put to good use as well.
  • During all of this, a friend recognized my desire to simplify my life and my surroundings, and recommended the book The Life Changing Magic of Tidying Up. It is written by a consultant in Japan who helps clients clean out and organize their homes and offices. I found the book very helpful, but it was definitely written for a different culture. However, the overarching message is one that we all might need to hear from time to time: surround yourself with only things that "spark joy." She also describes the best way to declutter and organize your home, called the KonMari method, so if you need help with that, I'd highly recommend this book.
  • In what may have been an act of intervention by the universe, I stumbled upon coupons for a label maker AND plastic storage tubs at Target just as I was getting ready to tackle the rest of our house using the KonMari method. I spent about a week going through the rest of our stuff and getting rid of what no longer sparked joy, and completely reorganizing what was left. I can't even tell you how much cleaner and tidier our house looks now. The old adage, "A place for everything and everything in its place," is truly a game changer.
I have always been someone who has do things in leaps and bounds, not bit by bit. I'm not one of those people who can spend 15 minutes a day working on this project, then 20 minutes on another. Once I start something, I HAVE to finish it. So all the work around our house definitely caused me to lose focus on my cooking and eating habits. Now that the house work has finally calmed down a bit, I'm ready to dust myself off and get back to work in the kitchen and on this li'l blog project. Life is nothing if not full of surprises -- things come up, commitments waver, priorities shift. The important thing is to accept that, and to get done what needs doing, and move on. So I hope you'll join me as I restart my Foodeymoon journey, and maybe I can even offer you a little inspiration if you need it.

Tuesday, August 18, 2015

Grass Fed Flat Iron Steak with Green Chile Adobo

 Raise your hand if you like steak! asdtyyugaasdr. That was me trying to type with one hand, 'cause my other hand was still in the air. #hilarious. Raise your hand if you like steak, but are concerned about the environmental impacts, increasing antibiotic resistance, and general health concerns of eating too much conventional red meat due to run-of-the-mill confinement beef production! Ok, I promise I will stop making you raise your hand now. I will just get to my point: Grass-fed beef is better for the environment, better for your body, and better for the cows, but maybe not so great for the taste buds if you don't know what you're doing. Because grass-fed beef has less fat in it, you need to cook it at a lower temperature and for less time than conventional beef or it will dry out and lose flavor. You also need to be okay with eating rare or medium-rare beef, as medium or higher just doesn't turn out that great (trust me, I tried it... miserable failure).

There is one other downside to grass-fed beef: the price tag. It's expensive. But if you focus on cheaper cuts of meat, you can totally make a nice meal for an at-home date night, which will still be way cheaper than going out. So with that in mind, go grab a nice flat iron steak from your local grass-fed ranch, some craft beers or a bottle of red wine, and get ready to sit down to a delicious date night dinner you can feel good about.


First, place a thawed grass-fed flat iron steak on a cutting board and pat both sides dry with paper towels. Season both sides with Kosher salt and freshly ground black pepper. Cut steak in half, and let sit at room temperature for 20 minutes.


In the meantime, add butter and extra-virgin olive oil to a cast iron or stainless steel skillet, and turn to medium-high heat. Let the skillet preheat before adding your steaks. The oil/butter combo should start to shimmer when it is ready. Carefully add your steaks. Cook for three minutes, then flip over and cook for three more minutes.


Using tongs, hold each steak upright side by side and cook all four sides, for about 30 seconds on each side.

Once all four sides are browned, place the steaks on a clean cutting board, sprinkle them with garlic powder, and let them rest for five to ten minutes. This might be the most important part to cooking meat. Yes, I know it smells uh-may-zing and you just want to scarf it down while it's nice and hot, but resting meat is crucial if you don't want to bite into a hockey-puck-like substance. Resting allows the muscle fibers of the meat to relax and reabsorb the juices. If you cut into it before this happens, all the juice escapes its meaty confines and then you are sad. Anyway, once they have properly rested, cut the steaks into strips, slicing against the grain of the meat, to reveal your gorgeous medium-rare interior. Ahhhh.


Transfer the steaks to their serving plates, and drizzle with Green Chile Adobo. We enjoyed ours with a big mixed summer salad and roasted organic red potatoes, along with a bottle of Shiner White Wing for a wonderful weekend dinner. Yum!


Make it work for you
This is one that you will have to make right before you eat. However, it goes very quickly, with a total of about eight minutes of cooking time. The rest is an opportunity to make your sides, set the table, do dishes, etc., which allows for easy prep and clean up, especially if you've already made your Green Chile Adobo. So this recipe is easily doable any night of the week.

Grass-fed Flat Iron Steak with Green Chile Adobo

3/4-1 lb grass-fed flat iron steak
Kosher salt and freshly-ground black pepper
1 tablespoon butter
1 tablespoon extra virgin olive oil
Garlic powder
Green Chile Adobo

Place steak on cutting board and pat both sides dry with a paper towel. Season both sides with Kosher salt and freshly-ground black pepper. Let set at room temperature for 20 minutes.

Put butter and olive oil in cast iron or stainless steel skillet on stove, and turn to medium-high heat. Once oil is shimmering, place the steaks in the pan and cook for three minutes. Flip and cook for three more minutes. Using tongs, hold both steaks thin side down on the pan for 30 seconds. Rotate and cook the next side for 30 seconds. Repeat until all sides are browned.

Place steaks on a clean cutting board. Sprinkle with garlic powder to taste. Tent with aluminum foil and rest for 5-10 minutes. Cut into 3/4-1 inch slices, cutting against the grain. Transfer steaks to serving plates, and drizzle with Green Chile Adobo to taste.

Printer friendly recipe
 

Wednesday, August 12, 2015

The Oil Cleansing Method

So today I thought I'd talk about something a little different, but still vaguely kitchen-related: The Oil Cleansing Method (OCM). This is a way of cleaning my face that I started to do about two months ago, and I don't know if I'll ever go back to using conventional cleansers on a daily basis. First, a little background...

Growing up, my skin was pretty easy to take care of. I got the occasional pimple as a teenager (two days before a formal dance, like teenage-angst-inducing clockwork), but fortunately I never struggled with acne. So I didn't give much thought to my skin-care regimen. Then, a few years ago (in my mid-twenties), my skin suddenly got SUPER sensitive. Like, the skin around my eyes was constantly red, rashy, and swollen. I had to completely stop using all the cheap drug-store cosmetics, cleansers, and moisturizers that I had relied on for so many years, and start experimenting with more high-quality and expensive items. After a few years (yes, years) and numerous different products, I finally got the redness and swelling under control, but I would still get dry patches under my eyes and on my cheeks. Some days they would be irritated and hurt, and I always ended the day with my skin flaking off, but I kinda just lived with it. Fortunately, I stumbled upon the OCM on Pinterest (isn't Pinterest amazing?!) and decided to give it a shot.


Now, there are tons of good blogs already devoted to the OCM, so I don't feel the need to rehash the process and the benefits here. Mainly, I want to just testify to its effectiveness and tell you how I successfully came up with the best blend for me. When I first started using the OCM, I had no intention of starting a blog, so I didn't take before and after pictures. I am kicking myself for that now. I just wish you all could see the difference in my skin. It's really amazing, especially after all that I've been through trying to get it back to normal. So, if you want to know more about the OCM, go here and here. Go ahead, I'll wait til you get back....

Ok, so now that you know why the OCM is amazing and how to do it, I'm going to let you know how I figured out what works for me. First off, I used the blogs referenced above to decide which carrier oils to use. Since my skin is dry with a normal T-zone, I needed a combination that would moisturize, but not clog my pores with excess oil. So I went with castor, jojoba, and avocado oils. I initially bought the smallest size I could in all three varieties at Sprouts, just in case it didn't work out. This is less economically effective, but I figured I'd be wasting less if I didn't want to continue using the OCM.


I gave myself about two weeks to experiment with different proportions of oils. So to start with, I used the recommended ratio of 10% castor oil and split my two carrier oils (40% avocado and 40% jojoba). During this time, I simply eyeballed each portion and poured them into a shot glass, mixed, and used. I just did enough for one use at a time. Luckily, the 10%:40%:40% ratio worked for me, so I didn't need to do any adjusting. After two weeks, I knew that I loved the OCM and I found the ratio of oils that worked for me. But I wanted to add a little more oomph to my mix. So I used this chart to find an essential oil that would be even more beneficial to my skin. I decided on Geranium oil, and ordered some from Young Living. If you decide to add some essential oil(s) to your blend, this is where the sticker shock may come in. However, Young Living is one of the purest essential oils on the market, and there are ways that the OCM actually saves you money, which I'll discuss later.

Once I received my Geranium oil, I first put a drop on the inside of my elbow before bed, to make sure I didn't have a reaction overnight. Then I did the same on my neck the next night. This let me know that I probably wasn't sensitive to this oil, so I started adding one drop of it to my shot glass mixture. I did this for a week, to make sure I liked the combination and that the skin on my face wouldn't react to it. At that point, I was finally ready to commit to mixing up a batch. I had an empty 3 oz squeeze bottle from a package of travel-sized cosmetic bottles I bought at Target awhile back. So now I just eyeball the 10% caster + 40% jojoba + 40% avocado oils, and leave a little room at the top of the bottle for the Geranium oil. I add 12 drops of that and gently mix everything up.


Alright, let's talk about why I think the OCM is so amazing and that you should try it.
  • My skin feels awesome. It also looks awesome. It's moisturized and dewey and looks young and fresh and some days I think I look like I have way more energy than I actually do. Isn't that what we go to the store and/or dermatologist and pay a bunch of money for, ultimately? I still wash my face with a gentle cleanser (Dove unscented bar soup for sensitive skin) two nights a week and I can't believe how raw my face feels afterward. I didn't even realize how much of the natural protection and nourishment I was stripping off with conventional cleansers, even relatively gentle ones, every night.
  • On the nights that I use the OCM, I don't even need a moisturizer. I use eye cream and that's it. I also don't need to use a separate eye make-up remover. Those are the two major ways that the OCM saves me money.
  • Since my skin is so much more nourished, it's much less reactive to the cosmetics that I use. So when I put moisturizer on in the morning before make-up, I'm actually able to use a less-expensive brand (CeraVe) than I was relying on previously (which still didn't work nearly as well).
  • I can customize the types of oils and their ratios to what works best for me and my skin, which is something that you just can't do with cleansers and moisturizers from the store. Therefore, you're not wasting money on products that don't work for you and you don't have to deal with the hassle of trying to return something you don't love.
  • The process feels like a mini trip to the spa. Who doesn't love going to the spa?! It's a relaxing way to end your day and let you body know it's almost time for bed.
  • The OCM totally lines up with my food philosophy. I know exactly what I'm putting in it and what's going on my skin. This is exactly why I opt to cook at home so much, rather than rely on processed food. So of course it's a natural fit.

Feel free to use the process I described here and give the Oil Cleansing Method a shot. I hope you love it as much as I do. I would love to hear about your experiences in the comments section!

Sunday, August 2, 2015

Asian Cabbage Salad

Sometimes a salad is more than just a salad.

Let me explain. You may notice a few less photos for this post than normal. Basically, I had my day off arranged so that I could prep and photograph this dish during the good afternoon light in my kitchen. I had a few pounds of chicken breasts in the slow cooker for my shredded chicken, set to come out at just the right time for a late lunch/early dinner. Then we get a call that we need to go pick someone up from the hospital and take them home. The chicken is almost done, but not quite, and I'm losing my afternoon light. Life just kinda likes to get in the way of your plans sometimes, huh? Anyway, I felt privileged to have the opportunity to be there for this person when they needed us, so out the door we went. And guess what: when we got back home later, the chicken was somehow not overcooked and I got some okay photos. Life just kinda works out sometimes, huh?

When we finally ate this salad for dinner that night, I first and foremost was glad that our hospital ride was fine and dandy, and I felt just a little more appreciative of the nutrition that bowl full of healthy veggies was providing me. Now, hopefully you don't have to have the opportunity for a similar mini-life lesson when you make this salad, but I hope you appreciate it all the same :)

I modified the recipe from What's for Dinner? to fit our tastes/pantry and make it just a liiiiitle bit healthier. This salad has an amazing crunchy texture and is super satisfying. It can be served as a side (it goes great with salmon and would be perfect to take to a barbeque), or top it off with some Slow Cooker Shredded Chicken to make it an entree.


First, combine all your ingredients for the dressing and put it in the fridge. I really love the taste of sesame oil, so I used a full teaspoon. If you're not as big of a fan, use the smaller amount. I put the dressing in a jelly-sized Mason jar so I could shake it well when I was ready to dress my salad. This can be done up to three days ahead of time. Then, chop your veggies and add them to your bag of coleslaw mix. Stir to combine. Dress the salad 30 to 60 minutes before serving and stick it in the fridge.


Toast your almonds and sesame seeds. Do not try to toast both at once. Since they are different sizes, one will burn before the other is toasted. Set them aside until you're ready to serve the salad.


Add your almonds and sesame seeds to the salad and mix it all together. Place each serving in its dish, and top with chicken if desired. Savor the mix of colors and textures.


Make it work for you
First shift: If using as a side, you can definitely make this salad on a weeknight. If using as an entree, make sure to have some chicken in the fridge, ready to go. Try slow cooking the chicken, chopping the veggies and making the dressing on your "Sunday" to quickly throw it all together for dinner the next night.
Second shift: Make the chicken, chop the veggies, and mix the dressing on your day off. Throw it all together the next day before work for a quick lunch, or take some for dinner. Leave the rest at home for your family's dinner. Eat up any leftovers within two days.
Third shift: Chop the veggies and prep the dressing before you go to sleep. Combine them all and add chicken for dinner, or take some to work for the next few nights. If you need chicken, prep it in the slow cooker insert and stick it in the fridge before you go to bed. Have a spouse/roommate/significant other/kid turn it on to low while you're still sleeping, or turn it on right after you get up. Shred the chicken and add it to your salad.

Asian Cabbage Salad
Modified from What's for Dinner?

Dressing
2 tablespoons extra light olive oil
2 tablespoons apple cider vinegar
1/4 cup rice vinegar
2 tablespoons honey
1/2 teaspoon salt
2 teaspoons soy sauce
1/4 teaspoon garlic powder, or one small garlic clove, pressed or minced
1/4 teaspoon freshly-ground black pepper
1/2 to 1 teaspoon sesame oil

Salad
1-14 ounce bag coleslaw mix
1 stalk celery, sliced
1/2 cucumber, sliced
20 sugar snap peas, ends removed, and sliced
1/2 red bell pepper, thinly sliced
1/4 red onion, thinly sliced
1/3 cup cilantro stems and leaves, chopped (optional)
1 tablespoon sesame seeds
1/2 cup slivered or sliced almonds
 Slow Cooker Shredded Chicken, optional

Add all dressing ingredients to jelly-sized Mason jar and shake well. Store in refrigerator until ready to use, up to 3 days ahead of time.

Add salad ingredients to a large bowl and stir. Shake dressing well and mix into salad. Cover and refrigerate for 30-60 minutes.

Heat small, dry nonstick skillet over medium heat. Add almonds and toast until golden brown and fragrant, stirring often. Remove from heat and set aside. Repeat the process for sesame seeds.

Add almonds and sesame to salad when ready to serve. Mix well, divide into serving dishes, and top with chicken if desired.

Printer friendly recipe 

Wednesday, July 29, 2015

Pork Chops with Green Chile Adobo

Growing up, we didn't eat much pork. My grandpa raised cattle and my grandma raised chickens -- why stray from what you know? I started cooking pork a few years ago, in order to get a little more variety on our dinner plates. I had no idea what I was doing at first, and definitely churned out some pretty underwhelming dishes. Luckily, instead of giving up on pork, I did a little research and have made some consistently delicious meals ever since.

The secret to good pork is based on the scientific principles of diffusion and osmosis. Their practical application to cooking is called brining. Basically, you make salt water at a specific concentration and soak your pork in it. The salt moves from an area of a higher concentration, the brine, to an area of lower concentration, the meat. Perhaps you remember the saying, "Where salt goes, water follows," from high school science classes. This is where osmosis comes in. The water moves into the cells of the meat, which now has a higher concentration of salt, in order to create balance. This really increases the juiciness of the meat. As an added bonus, the salt infuses the meat with flavor, leaving you a little less work to do down the line. And the best news of all: it only takes 30 minutes to brine pork chops. You have enough time to work on your side dishes while they're brining, without the process taking up your whole night.

When it comes to actually cooking pork chops, I've found the process described at The Kitchn to be quick and reliable. I had a feeling that drizzling on a little Green Chile Adobo before serving would really up the flavor factor, and turns out I was right! (Doesn't it feel good to say that every once in awhile?!) I served ours with a side of mashed butternut squash mixed with a pat of butter, a splash of cream, and some salt, pepper, cumin and smoked paprika for an easy, delicious weeknight meal.


First off, brine your pork chops. You can obviously make them without this step, but they won't taste as good or be nearly as juicy. Brining lean meats takes them from "meh." to "yum!" You can also add other spices and herbs to your brining solution, but I find just the salt to add sufficient flavor. I save my herbs and spices for other uses where they'll be more noticeable. After brining for 30 to 60 minutes, turn your oven on and stick your oven-safe pan in to preheat (non-stick pans are NOT oven safe). Remove your chops from the brining solution and pat dry with paper towels. Rub them with extra-virgin olive oil, and season generously with freshly-ground black pepper. Whenever I brine something, I don't season with salt again until I'm done cooking and have a chance to taste. It rarely needs more. Turn your stove top on to medium-high heat, and CAREFULLY remove your pan from the oven, using oven mitts. Place the pan on the burner, and, using tongs, lay the chops in the pan. You're going to cook them until they are brown on the bottom, for about three to five minutes. Flip the chops, then carefully put the pan back in the oven using oven mitts. Roast until they reach 140 degrees F, for about six to ten minutes. Place them on a plate and cover with aluminum foil for about five to ten minutes in order to allow the juices to settle back in.


Place each chop on its serving plate, drizzle with Green Chile Adobo, and enjoy!


Make it work for you
First shift: These pork chops are easy to pull off on either a work day or day off, especially if you have the Green Chile Adobo prepared in advanced. They also make good leftovers, so you could also treat them as a make-ahead meal and use for lunches throughout the week.
Second shift: I've made these pork chops before work a few times, and it works out great. I got them in the brine, ate breakfast, then finished them off with plenty of time before I had to leave for work. If you make them on your day off for dinner, try to make a few extra for lunches.
Third shift: You can definitely make these on a work night before leaving, or in the morning when you get home. While they're brining, you can eat breakfast, or put together your dinner if you're using them as a make-ahead meal. Then they'd be ready to reheat for lunch/dinner, or to take with you to work.

Pork Chops with Green Chile Adobo

3 tablespoons Kosher salt, or 2 1/2 tablespoons table salt
4-6 pork chops, bone-in or boneless
Extra virgin olive oil
Freshly-ground black pepper
Green Chile Adobo, to taste

In a large microwave-safe bowl, microwave 4 cups of water until warm, about 60-90 seconds. Add salt and stir until dissolved. Add 2 cup cold water and stir, making sure all salt is still dissolved. Place pork chops in salt solution and cover. Refrigerate for 30-60 minutes.

Preheat the oven to 400°F and move the rack to the middle position. Place oven-safe pan in oven to preheat. Remove the pork chops from the brine and pat all sides dry with a paper towel.  Rub chops with extra virgin olive oil and season with freshly-ground black pepper. Carefully remove the pan from the oven, using mitts. Place on stove burner turned to medium-high.

Place pork chops in pan and sear until brown on one side, about 3 minutes. Turn chops over and place pan in preheated oven. Roast until chops are done in the thickest part of the meat, until they reach 140°F, about 6-10 minutes. Remove from oven, transfer to plate, and rest for 5-10 minutes.

Transfer to serving dish, spoon juices on top, and drizzle with Green Chile Adobo. Season with additional salt if necessary.

Printer friendly recipe 

Wednesday, July 22, 2015

Green Chile Adobo

So about a month ago, I was listening to an America's Test Kitchen podcast while I was in the kitchen cooking. I am a nerd, therefore I must completely nerd out about my obsessions passions, including food and cooking. And baking. And also eating. Anyway, this episode featured renowned Chicago chef, Rick Bayless. He was giving advice on how to replicate his apparently amazing Mexican food at home. One of the suggestions he mentioned was making a batch of his Green Chile Adobo. This can be treated like a sauce or condiment, and he stated that it can be kept in the fridge for up to six months. So the few minutes you invest in making it now really pays off in fresh, herby, spicy dividends for quite awhile. I knew that I had to make some. And I'm so glad I did. This sauce can be used in a variety of ways and will really help make your average weeknight dinner into something a little more special.


Start off by roughly chopping your cilantro and parsley, and toasting your serranos and garlic. My peppers are all different sizes because we picked some up at the farmers market. Later, when I was at Sprouts, I realized how small they were so I grabbed a few bigger ones while I was there. I guess that's the kind of thing that can happen when you work with a new ingredient for the first time.


You're actually given the option of softening your peppers and garlic in the microwave, but I would discourage it. You just aren't going to be able to replicate the flavor that you get from toasting on the stove. I mean, just look at the char on those things. Makes my mouth water just looking at it! Let the peppers and garlic cool a bit, then remove the skins from the garlic and roughly chop, along with the peppers.


Add all your ingredients to your food processor or blender, and let 'er rip.


Blend until the adobo looks similar to pesto. This will fit perfectly in a pint-sized mason jar. If you try a spoonful straight out of the jar, it is going to be sal. ty. But don't panic. When you add it to other food, it's going to contribute a ton of flavor and the saltiness will be diluted. This will work on lots of stuff, like meat, veggies, potatoes, tacos/enchiladas/fajitas, soup, etc. I think you'd be able to add some to mashed avocado for a super easy homemade guacamole, or drizzle a little into the dressing for Southwestern Chopped Salad for an extra boost of flavor. I've used this on top of pork chops and mixed into mashed potatoes, and both were amazing. This is such an easy way to add fresh, unique, homemade flavor to so many dishes, give it a try!


Make it work for you

Another recipe that can fit into anyone's schedule, this sauce can be made at any time. I made mine while cooking a different meal, since I had the cutting board and knife out anyway. It can keep in the fridge for up to six months, so go ahead and throw it together whenever you have a spare 20 minutes.

Green Chile Adobo
by Rick Bayless

1/2 head of garlic, separated into unpeeled cloves
4 to 5 fresh serrano chiles, stems removed
1 large bunch cilantro, (thick bottom stems cut off), roughly chopped (about 2 cups loosely packed)
1 large bunch flat leaf parsley, (thick bottom stems cut off), roughly chopped (about 2 cups loosely packed)
1 cup olive oil
2 generous teaspoons salt

Set a large (10-inch) skillet over medium heat.  Lay in the garlic and chiles and roast, turning regularly, until soft and browned in spots, about 10 minutes for the chiles and 15 for the garlic. (If you’re really short on time, you can soften them in a microwave: Cut a slit in each garlic clove and combine with the chiles in a microwavable bowl. Cover with plastic wrap, poke a few holes in the top and microwave on high for 30 seconds.) Cool until handleable, then slip off the garlic’s papery husks. Roughly chop everything (no need to remove the chile seeds).

In a blender or food processor, combine the garlic and chiles with the cilantro, parsley, olive oil and salt. Process, stopping to scrape down the sides if necessary, until nearly smooth (it should look a little like pesto). Transfer to a pint-size jar and store, covered, in the refrigerator, where it will last several months.

Printer friendly recipe

Friday, July 17, 2015

Portuguese Baked Eggs

In my last post, I told you about one of the new perks to my new work schedule: our CSA membership. Well, not to be too repetitive, but this post is about another perk: brunch. I l.o.v.e. breakfast and brunch. What amazing ways to start the day, especially if they involve a gathering of friends and family. There's not much in this world that's more comforting than a nice cup of coffee and some yummy breakfast food shared with your loved ones.

When I was working evenings, my husband's aunt and uncle had us over for brunch a few times. I would drag myself out of bed and stumble through their door, bleary eyed and asking for a cup of coffee, much like a zombie requests brains. Needless to say, we didn't reciprocate their hospitality as we should have. But now I finally have the chance, and I was so excited to do so. Aunt B always pulls out all the stops when she entertains; you can tell it's a passion of hers. Seriously, you should have seen the bridal shower she threw for me. Amazing. I miiight be sucking up a little bit right now. Anyway, I know I'll never get to her Entertaining Level: Expert, so I wanted to focus on serving them something delicious, nutritious, and relatively simple. Enter: Bon Appetit's Portuguese Baked Eggs. I decided to skip the typical syrupy sweet breakfast fare and go for something savory and satisfying. I love an opportunity to get a nice big helping of veggies first thing in the morning. Plus I could do most of the work the night before, which made for a smooth morning.

My attempts have not looked nearly as lovely as Bon Appetit's (duh). Once you plate this dish, you basically end up with ricotta cheese and egg yolk mixing in with the herby bell peppers and tomatoes, which results in an umami explosion in your mouth. This combination of flavors is really something special. I served this dish with farmers market country loaf (sliced and toasted), my great-grandma's homemade jam, fruit salad, and mimosas -- truly entertaining made easy.


One great feature of this dish is that you can actually make the base ahead of time. This first portion can be cooked and stored in the refrigerator for a day or two, then you can continue with the cheese/egg steps when you are ready to serve. Either way, your first step is to slice up your bell peppers and onion while your pan is preheating.


I've found that they don't need a ton of babysitting, so to save time, feel free to put them on the stove to cook while you're completing your next step. Just remember to stir them occasionally.


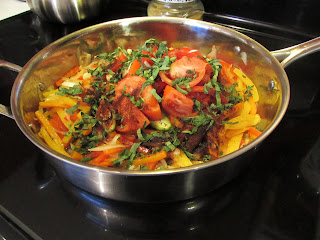
Next, chop and slice your tomatoes, garlic, jalapeno, and herbs, and measure out your spices. Add them all to the pan once the bell peppers and onion are just beginning to brown. Reduce the heat, and let everything simmer and soften and meld together. Again, this step doesn't need much attention, so you should have time to do dishes, set the table, etc. while this is happening. Once all the veggies are very soft and the liquid is mostly gone, remove your jalapeno slices and season the mix with salt and pepper. [If you are preparing this base ahead of time, store the veggie mixture in a microwave-safe container in the fridge for a day or two. Once you are ready to serve, stick the container in the microwave for a few minutes, until the mixture is warm, and continue on from here.]

Pour the veggies into a 13x9" casserole dish, forming an even layer. Create six divots in the mixture with the back of a spoon. Add a spoonful of ricotta to each, then top off with an egg. I highly recommend cracking your egg into a small bowl first, just in case it's bad or you get shell in it. The whites will start to cook, due to the heat of the base, but this is ok. Sprinkle cheddar and Parmesan on each egg, and top off with salt and pepper.


Bake for about 15 minutes, turning halfway through, until the egg whites are set. If you prefer runny yolks, take the dish out and serve immediately. The yolks will continue to cook with another minute or two in the oven, or as the dish sits undisturbed outside the oven. Serve with bread or toast to soak up all the savory juices that will be left behind. Yum!


**Note: This recipe can be cut in half and baked in an 8x8" casserole dish, with three or four eggs.
**Another note: Not just for breakfast/brunch, this dish makes a great light dinner as well.
**One more note: I put my slices of bread on a small cookie sheet and toast them in the oven as the dish is baking, flipping and turning about a quarter of the way through, and removing when done to my liking.

Make it work for you

This recipe is super flexible and can work for anyone, since the majority of hands-on work can be done ahead of time. I actually prepared the veggie mixture the night before brunch, while my Scallops with Creamy Braised Leeks were in the slow cooker for dinner. The stove top portion doesn't require constant stirring, so you're free to get started on dishes, cleaning the kitchen, etc., saving you time once it's done. And if you do serve this dish to guests, it looks like you really slaved away all morning, which makes everything taste just a little bit better in my opinion.

Portuguese Baked Eggs
From Bon Appetit

1/4 cup olive oil
3 bell peppers, any color, thinly sliced
1 medium red onion, thinly sliced
2 beefsteak tomatoes, cut into wedges
8 garlic cloves, thinly sliced
1 jalapeno, with seeds, halved lengthwise
1/4 cup fresh basil leaves
2 tablespoons fresh oregano leaves
1 1/2 teaspoons chili powder
1 teaspoon paprika
Kosher salt and freshly ground black pepper
1 cup ricotta
6 large eggs
1 cup grated sharp white cheddar (about 4 oz.)
1/4 cup grated Parmesan (about 1 oz.)
Toasted country-style bread (for serving)

Heat oil in a large heavy pot over medium heat. Add bell peppers and onion and cook, stirring occasionally, until softened and just beginning to brown, 10-12 minutes.

Add tomatoes, garlic, jalapeno, basil, oregano, chili powder, and paprika to pot. Reduce heat to medium-low and continue to cook, stirring occasionally, until vegetables are very soft and liquid is thickened, 20-30 minutes; season with salt and pepper. Discard jalapeno.

Preheat oven to 400°. Transfer bell pepper mixture to a 13x9" baking dish. Using the back of a spoon, make 6 evenly spaced divots in mixture. Spoon a dollop of ricotta into each divot, then crack 1 egg into each. Top with cheddar and Parmesan; season with salt and pepper. Bake, rotating dish halfway through until Parmesan is melted and egg whites are almost set but yolks are still runny, 15-18 minutes.

Serve baked eggs with toast. (Yolks will continue to cook as dish sits, so serve right away if you prefer your eggs soft).

Do Ahead: Bell pepper mixture can be cooked 1 day ahead. Let cool; cover and chill.

Printer friendly version